Substance Painter
In this start to finish texturing project within Substance Painter we cover all the techniques you need to texture the robot character.
#
46
30-04-2005
, 09:04 PM

Lead Modeler - Framestore
Join Date: Feb 2003
Join Date: Feb 2003
Location: UK
Posts: 6,287
Ive just downloaded your image to tinker with, Im off for the evening now as Im just real tired, will post a 'review' with my 'infamous' red pen tomorrow at some point.
Later
_J
#
47
01-05-2005
, 07:51 AM

Registered User
Join Date: Jan 2005
Join Date: Jan 2005
Location: vienna
Posts: 1,095
the picture below shows my big problem which I´m allways bouncing back to. In reality the head - from the meshpoint seen - is a cube and talks me into believing he is a sphere. what ever I try with it the very basic nature of the head is a cubeshape. e.g the alien guy´s nature is a sphere or some kind of shape in between I wasn´t able to undertand until now. so if you don´t mind I will stick to the alien guy and try to understand what the meaning of this strange mesh people call edgloop/or head is.
cause I´ve to work the next 11 hourz I´ll post tomorrow what I have come up with. and thx again for donating your time!
PS: this is the former head I was working on.
Last edited by Falott; 01-05-2005 at 07:53 AM.
#
48
17-06-2005
, 01:47 PM
Registered User
Join Date: Jan 2005
Join Date: Jan 2005
Location: vienna
Posts: 1,095
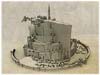
I built this skeleton. my first asking is about the local rotation axis of a joint. after arranging all of them I did this:
orient joint
created IK handles - 1 for each legs
inside maya 5 tells to ->
"Activate the local rotation axis and modify all of them so that the rotation axes are perfect."
what is a perfect rotation axis?
if I do so with the local rotation axes tool it happens that the whole foot rotates with the LRA but the "original xyz-axes" which can be moved with the rotate tool stay the same. This makes no sense!
maya docs say ->
"rotate axis offsets the orientation of the object relative to the orientation of the object's local rotation axis."
well, that's fine for me! but why is the geometry rotating whilst manipulating the LRA??
I wonder if someone could paint a picture for me. So I might be able to understand. don´t take it literal! I´ll once again RTFM.
added a pic - hope it is not too chaotic
everything starts and ends in the right place at the right time.
#
49
17-06-2005
, 01:48 PM
Registered User
Join Date: Jan 2005
Join Date: Jan 2005
Location: vienna
Posts: 1,095
everything starts and ends in the right place at the right time.
#
50
17-06-2005
, 05:25 PM
Registered User
Join Date: Jun 2004
Join Date: Jun 2004
Posts: 279
but the mesh of the head looks a bit odd.
try to set the loops this way:
#
51
17-06-2005
, 05:34 PM
Registered User
Join Date: Jan 2005
Join Date: Jan 2005
Location: vienna
Posts: 1,095
everything starts and ends in the right place at the right time.
#
52
17-06-2005
, 09:12 PM
Lead Modeler - Framestore
Join Date: Feb 2003
Join Date: Feb 2003
Location: UK
Posts: 6,287
Your Local axis on the legs could have been created perfectly when you drew them. Just by putting the axis orientation to 'none' in the settings. This particular setting is used mainly Ive found with an RP IK solver.
bear in mind the axis will always follow the direction you draw (this may sound obvious)
As for the rest of the joints on the body and arms I usually do the joint with Z up the bone. Sorry I cant be a little more helpful right now as Ive not rigged for a bit so Im a little rusty, but a few weeks and I'll be back on it.

_J
Last edited by Jay; 17-06-2005 at 09:18 PM.
#
53
18-06-2005
, 09:23 AM
Registered User
Join Date: Jan 2005
Join Date: Jan 2005
Location: vienna
Posts: 1,095
everything starts and ends in the right place at the right time.
#
54
18-06-2005
, 04:21 PM
Lead Modeler - Framestore
Join Date: Feb 2003
Join Date: Feb 2003
Location: UK
Posts: 6,287
No probs, rigging is not easy, I wish I could do it without the manual. I think after rigging the next 6 characters Ive done or so things should be a little bit better.
Im glad the image was simple for you to follow. Theres just not enough stuff explained in a simple way for rigging.
Ive only rigged 2 production characters in the last year and they work really cool as they have blend shape corrections on so the future looks promising on that side of things too.
Later
_J
#
55
01-07-2005
, 03:50 PM
Registered User
Join Date: Jan 2005
Join Date: Jan 2005
Location: vienna
Posts: 1,095
everything starts and ends in the right place at the right time.
#
56
01-07-2005
, 05:20 PM

Registered User
Join Date: Mar 2003
Join Date: Mar 2003
Location: Billund, Denmark
Posts: 992
Carsten Lind
Senior 3D Artist,
Maya Software Manager & Maya Instructor
LEGO Systems A/S
#
57
01-07-2005
, 05:29 PM
Registered User
Join Date: Jan 2005
Join Date: Jan 2005
Location: vienna
Posts: 1,095
everything starts and ends in the right place at the right time.
Last edited by Falott; 02-07-2005 at 07:31 AM.
#
58
04-07-2005
, 11:29 AM
Registered User
Join Date: Jan 2005
Join Date: Jan 2005
Location: vienna
Posts: 1,095
thx again for the tip caligraphics!
everything starts and ends in the right place at the right time.
#
59
04-07-2005
, 01:11 PM
Subscriber
Join Date: Dec 2004
Join Date: Dec 2004
Posts: 203
Hi there Fallott,Originally posted by Falott
well well, I think about rebuilding the whole mesh. and there is something else.
I thought I take a break and start looking at some other peoples work, and so far I must have to say that is the best looking girl I ever seen. In addition, unless I am miss understanding you, I don't think you need to rebuild everything. In my opinion, I think that even though the loops of the face could be built better, the rest of the body looks great. As for the face don't discurage, I haven't been able to get it right either. Also to help you out, I found a book that seemed interesting on modeling a human. It is called Maya 5 Fundementals which also includes video tuts that follow with the book. Though I haven't finished watching the video with head modeling, but from what I have watched so far the tutorial shows some tricks on using the create polygon tool and then extruding the edges. Considering that my last program I had delt with spline patch modeling, the create polygon tool works sort of in the same manner which I think makes things easier for me than tring to shape out a face from a cube. I am really looking forward on finishing the video after I finish my cartoon dog.
#
60
04-07-2005
, 04:11 PM
Registered User
Join Date: Jan 2005
Join Date: Jan 2005
Location: vienna
Posts: 1,095
exactly this way of modeling I first thought to be great and easy modeling caused me major problems. It´s cool in the beginning to block out the main part of - in my case - the head. but I had a serious problem to get the mesh into a usuable edgeLoop later on. when painting the silhouette with the createPolygonTool and extruding it - the headShape is cubic and edges are allocated in a cubic grid style. I hope you understand my goddamn english.. I simply failed on rebuilding the cubic into loopy mesh.the tutorial shows some tricks on using the create polygon tool and then extruding the edges.
But! I found such a Terminator-DVD for organic modeling and bought it today - can´t wait the delivery of it! I found it on
https://www.freedom-of-teach.com/main...oads&pid=index
watch the short videos man! this guy has an awesome style of modeling - and he is damn fast!! additionally his way of tweaking the geometry looks so relaxed!
everything starts and ends in the right place at the right time.
Posting Rules Forum Rules
Similar Threads
Can't open part 3 of the lighting tutorial
by tclubine in forum Maya Technical Issues replies 2 on 30-05-2008
humanModeling part III
by Falott in forum Work In Progress replies 14 on 23-07-2005
The Oliphant Tutorial
by bradjames in forum SimplyMaya Tutorials replies 13 on 02-08-2004
Part 1 & 2 of the VIP hand Modeling Tutorial
by Kevin in forum Maya Modeling replies 17 on 12-10-2002
monster movie part 3 and 4!!!
by Kevin in forum Maya Basics & Newbie Lounge replies 15 on 10-10-2002
Topics


Free Courses


Full Courses


VFX News
How computer animation was used 30 years ago to make a Roger Rabbit short
On 2022-07-18 14:30:13
Sneak peek at Houdini 19.5
On 2022-07-18 14:17:59
VFX Breakdown The Man Who Fell To Earth
On 2022-07-15 13:14:36
Resident Evil - Teaser Trailer
On 2022-05-13 13:52:25
New cloud modeling nodes for Bifrost
On 2022-05-02 20:24:13
MPC Showreel 2022
On 2022-04-13 16:02:13