Integrating 3D models with photography
Interested in integrating your 3D work with the real world? This might help
#
1
24-05-2006
, 06:43 PM
Registered User
Join Date: Jul 2003
Join Date: Jul 2003
Location: In the Caribbean
Posts: 193
Rigging basic question
I have created my first skeleton with a simple model I see people using circels or other type of geometry to control the moves on the arms legs etc, is there a turorial i can find or what should i parent to the geometry to do that?
thanks in advance
If you can Imagine, Draw it, if you Draw it, Animate it, then it becomes a Masterpiece.....
#
2
24-05-2006
, 08:09 PM
Registered User
Join Date: Feb 2005
Join Date: Feb 2005
Location: This Place
Posts: 220
One thing that this doesn't account for is iK handles - those you have to parent to a seperate set of control curves (for a couple of double-transform problem/reasons); at least sorta. The basic idea still applies though....
Book Wise
https://X4nd5r.deviantart.com
#
3
23-06-2006
, 12:18 AM
Subscriber
Join Date: Dec 2004
Join Date: Dec 2004
Location: Germany
Posts: 68
Blah
there are many ways to bring in intuitive handles to control your rig. As long as You are not familar with constrains - i would not use them :bandit:
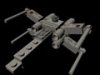
An example for the constrain method is the reverse footcontrol in the image. You lay down a 2nd chain on joints to control the 1st one via point and orient constrains. Then parent the 2nd chain to a curve. Quite common - but i don't like it at all.
On the left side is a pure IK set.
Be aware that you are unable to freeze transform on an IK handle so you don't want to animate an IK handle directly. Grouping is the name of the game. By simply grouping an IK handle to itsself you get a transform node that can be zeroed out and parented or grouped whereever you want.
So, let's go...
RPsolver for the hip-ankle, and SCsolver for ankle-ball / ball-toe. You can't see the ikHandles in the perspective, cause I hide them. In the Hypergraph they are visible. The 3 IK handles are simply grouped to get a transform node and the group (foot) is parented to the curve with the foot shape. I also added extra attributes for the foot movement.
So i can grab the foot shape and move it. The scale and visibilty is hidden via channel control cause you don't need them.
If You want, i can post a little howto rig the footcontrols since i didn't do it for the image.
At last some basic :
Why a curve shape and not some geometry?
: a single curve won't render - a piece of geometry will.. Imagine you batch render the scene and 20 hours later you see the little pieces of geometry in your render, you forgot to set to "don't render"

Do not apply any ik before your skin is bound and your weights are set. It's easy to go back to a bind pose by just zero out all joints rotation axis and you can check all streching and weights with FK. But with ik on it - it will be much more difficult.
Hope that helps
cheers
Mac
..the Force is with me (sometimes)
Posting Rules Forum Rules
Similar Threads
Rigging Question
by Ozgalis in forum Animation replies 3 on 05-04-2011
Basic Rigging Question
by shwenkerbean in forum Maya Basics & Newbie Lounge replies 0 on 12-02-2008
Rigging question...
by briano in forum Maya Modeling replies 3 on 26-08-2007
rigging question
by WH33LS in forum Maya Basics & Newbie Lounge replies 1 on 29-08-2006
Really Basic Skin Binding Question
by clebo99 in forum Maya Basics & Newbie Lounge replies 7 on 01-10-2003
Topics


Free Courses


Full Courses


VFX News
How computer animation was used 30 years ago to make a Roger Rabbit short
On 2022-07-18 14:30:13
Sneak peek at Houdini 19.5
On 2022-07-18 14:17:59
VFX Breakdown The Man Who Fell To Earth
On 2022-07-15 13:14:36
Resident Evil - Teaser Trailer
On 2022-05-13 13:52:25
New cloud modeling nodes for Bifrost
On 2022-05-02 20:24:13
MPC Showreel 2022
On 2022-04-13 16:02:13