Introduction to Maya - Rendering in Arnold
This course will look at the fundamentals of rendering in Arnold. We'll go through the different light types available, cameras, shaders, Arnold's render settings and finally how to split an image into render passes (AOV's), before we then reassemble it i
#
1
22-02-2008
, 07:52 PM
Registered User
Join Date: Jun 2004
Join Date: Jun 2004
Location: Gothenburg, Sweden
Posts: 1,318
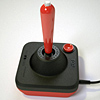
Super Nintendo Controller
#
2
22-02-2008
, 08:17 PM
Guest
Posts: n/a
:bow:
#
3
22-02-2008
, 08:19 PM

Subscriber
Join Date: Jul 2006
Join Date: Jul 2006
Location: London
Posts: 567
I think working on the textures to make the pad look a little worn in would really bring it to life. Maybe some marks on the buttons, or roughing up around the shoulder buttons.
Chris
#
4
23-02-2008
, 12:11 AM
Registered User
Join Date: Dec 2007
Join Date: Dec 2007
Posts: 58
#
5
23-02-2008
, 01:56 AM

Registered User
Join Date: Jun 2004
Join Date: Jun 2004
Location: Cleveland, Ohio (USA)
Posts: 1,541
i've still got my super nintendo hooked up to the tv, and all the buttons are purple. X & Y are a different hue from A & B, and one of the sets is also concave instead of convex...
the 4 color scheme i believe was used on the original japanese super famicom instead of the SNES.
otherwise, the renders are always awesome.
Accept no substitutions.
#
6
23-02-2008
, 05:49 AM
Registered User
Join Date: Jun 2004
Join Date: Jun 2004
Location: Gothenburg, Sweden
Posts: 1,318
Bendingiscool: Yeah I know, the latest couple of models I did I gave a slightly worn old look. This time I wanted a fresh new one though.
NeoStrider: This version was used in Europe and Australia. I should probably do the other version too.
#
7
23-02-2008
, 05:54 AM

Moderator
Join Date: May 2005
Join Date: May 2005
Location: Manchester Uk
Posts: 6,300
"No pressure, no diamonds" Thomas Carlyle
#
8
23-02-2008
, 09:49 AM

Registered User
Join Date: Dec 2005
Join Date: Dec 2005
Location: Brooklyn, NY
Posts: 3,708
any plans to make a big 80s game room / arcade place with all your cool models? probably asked you that before...
#
9
23-02-2008
, 10:20 AM
Registered User
Join Date: Jun 2004
Join Date: Jun 2004
Location: Gothenburg, Sweden
Posts: 1,318
Yeah I plan to do a render of all old stuff together somehow...
Hell of a work to assemble all the models into one scene, and they probably need some downsizing of the textures etc. since most models have a couple of 4kx4k textures - unless I want to wait 2 weeks for a render...
#
10
23-02-2008
, 10:35 AM
Registered User
Join Date: Dec 2005
Join Date: Dec 2005
Location: Brooklyn, NY
Posts: 3,708
#
11
23-02-2008
, 11:09 AM
Registered User
Join Date: Jun 2004
Join Date: Jun 2004
Location: Gothenburg, Sweden
Posts: 1,318
#
12
23-02-2008
, 05:45 PM
Registered User
Join Date: Jun 2004
Join Date: Jun 2004
Location: Gothenburg, Sweden
Posts: 1,318

#
13
23-02-2008
, 06:23 PM
Guest
Posts: n/a
BTW, you at least need to make a video showing your workflow, if you're not going to start doing tuts.
#
14
23-02-2008
, 06:41 PM

Registered User
Join Date: Feb 2008
Join Date: Feb 2008
Location: the kingdom of belgium
Posts: 6

no seriously good job i must say i love ur collourfull buttons

nice site BTW your realy good at texturing. greetz
one toke away from pro
Last edited by pothead; 23-02-2008 at 06:48 PM.
#
15
23-02-2008
, 07:39 PM
Registered User
Join Date: Jun 2004
Join Date: Jun 2004
Location: Cleveland, Ohio (USA)
Posts: 1,541
back in the day i also had a subscription to nintendo power, and they kept sending stickers with letters, decals, covers for the controllers/buttons, etc. so my controllers are still decked out with the decals and stickers from when i got them back when i was like 12 or so. sweet.
Accept no substitutions.
Posting Rules Forum Rules
Similar Threads
Combining Controller With Motion Path
by Darkmot in forum Animation replies 2 on 05-07-2012
Using A Controller With Maya
by AnthonyCg in forum Maya Basics & Newbie Lounge replies 5 on 06-06-2010
Super Villain Challenge
by mtmckinley in forum Previous Challenges (Archives) replies 50 on 01-09-2009
Old school Nintendo Controller
by Soulrider911 in forum Work In Progress replies 4 on 13-02-2009
Nintendo set wip
by c3e in forum Work In Progress replies 1 on 12-09-2006
Topics


Free Courses


Full Courses


VFX News
How computer animation was used 30 years ago to make a Roger Rabbit short
On 2022-07-18 14:30:13
Sneak peek at Houdini 19.5
On 2022-07-18 14:17:59
VFX Breakdown The Man Who Fell To Earth
On 2022-07-15 13:14:36
Resident Evil - Teaser Trailer
On 2022-05-13 13:52:25
New cloud modeling nodes for Bifrost
On 2022-05-02 20:24:13
MPC Showreel 2022
On 2022-04-13 16:02:13