Integrating 3D models with photography
Interested in integrating your 3D work with the real world? This might help
#
16
01-07-2007
, 02:38 PM

Subscriber
Join Date: Nov 2003
Join Date: Nov 2003
Location: Sweden
Posts: 326
Remember you don't have to go as high-poly as the example by no means. Think of it as tips on relaxing and locating extremities, and I wanted to show you curvature in anatomy, and a more solid ratio between shoulder-width to waiste/hips area.
Last edited by AlphaFlyte; 01-07-2007 at 06:58 PM.
#
17
01-07-2007
, 10:06 PM

Registered User
Join Date: Nov 2006
Join Date: Nov 2006
Location: Sweden
Posts: 482

#
18
01-07-2007
, 11:41 PM

Moderator
Join Date: May 2005
Join Date: May 2005
Location: Manchester Uk
Posts: 6,300
Its best off to get the proportion and the body shape correct before adding clothing etc as it just ends up being more work, as youve found out.
"No pressure, no diamonds" Thomas Carlyle
#
19
01-07-2007
, 11:50 PM
Registered User
Join Date: Nov 2006
Join Date: Nov 2006
Location: Sweden
Posts: 482
#
20
11-07-2007
, 11:23 AM
Registered User
Join Date: Nov 2006
Join Date: Nov 2006
Location: Sweden
Posts: 482
https://i61.photobucket.com/albums/h5.../uploadme9.jpg
The shoulders are more relaxed, i also changed the pose a bit(His right arm was pulled forward a bit and i turned the torso some.)
#
21
12-07-2007
, 03:23 AM
Moderator
Join Date: May 2005
Join Date: May 2005
Location: Manchester Uk
Posts: 6,300
"No pressure, no diamonds" Thomas Carlyle
#
22
18-07-2007
, 08:52 PM
Maniacal boy king of Babylon
Join Date: Aug 2005
Join Date: Aug 2005
Location: the netherlands
Posts: 1,605
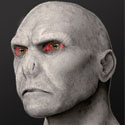
the only thing that i'm seeing in your last render is how the arms are connected to the body, it doesn't look natural i've added a picture so you can see how they should be connected
good luck man

#
23
24-07-2007
, 02:31 AM
Registered User
Join Date: Nov 2006
Join Date: Nov 2006
Location: Sweden
Posts: 482
This project was to large for me that is such an beginner in Zbrush but it gave me alot of experience and I learned that I have to use normal/displacement maps more then high-poly models.
Thanks alot for all the help I got during this challange and the best of luck to all the other participants.
#
24
24-07-2007
, 04:16 AM
Moderator
Join Date: May 2005
Join Date: May 2005
Location: Manchester Uk
Posts: 6,300
If your having problems with the numbers of polys for your model and UV mapping it heres a tip, Go into Zbrush and to the lowest level of subdivisions, export this model out as a obj, open maya and UV the model, export as an obj. Reopen your model (with all the polys i.e the Ztool) in Zbrush, go to the lowest level of sub divisions again, in morph target click store morph target, import the new UV'd object into Zbrush then with it selected click "switch morph target" your high poly model will then be UV'd same as the low poly one in maya.
"No pressure, no diamonds" Thomas Carlyle
Posting Rules Forum Rules
Similar Threads
Weyu - Winter challange
by Weyu in forum Previous Challenges (Archives) replies 19 on 02-12-2007
Summer Challenge!
by mtmckinley in forum Previous Challenges (Archives) replies 34 on 30-08-2007
Weyu - March/April
by Weyu in forum Previous Challenges (Archives) replies 3 on 05-04-2007
Dumb Question concerning summer jobs.
by Shadeblade in forum Maya Basics & Newbie Lounge replies 1 on 13-06-2005
Summer camps
by alienscience in forum Maya Basics & Newbie Lounge replies 5 on 03-05-2005
Topics


Free Courses


Full Courses


VFX News
How computer animation was used 30 years ago to make a Roger Rabbit short
On 2022-07-18 14:30:13
Sneak peek at Houdini 19.5
On 2022-07-18 14:17:59
VFX Breakdown The Man Who Fell To Earth
On 2022-07-15 13:14:36
Resident Evil - Teaser Trailer
On 2022-05-13 13:52:25
New cloud modeling nodes for Bifrost
On 2022-05-02 20:24:13
MPC Showreel 2022
On 2022-04-13 16:02:13