Beer glass scene creation
This course contains a little bit of everything with modeling, UVing, texturing and dynamics in Maya, as well as compositing multilayered EXR's in Photoshop.
# 1 30-12-2005 , 04:42 PM
GreenT The only one's Avatar
Registered User
Join Date: Aug 2005
Location: Belgium
Posts: 2

ultimate newbie

Hi, I have a problem that is keeping me busy for hours now :headbang: .
It is the following:
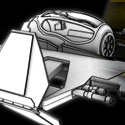
I want attach two nurbs at a corner (see picture), but I want it to attach in a rounded way. So the corner is not flat or squared.

user added image

I even tried it with making it with polygons so I could work with the 'wedge' tool, but even then it doesn't work, 'caus I only can do it with square shaped objects because of the edge you have to select.

I'm quit sure it is very simple, but then again, I'm trying to learn maya and I gave myself a big job here!!

Thanks for your help.


I used to be a shizofrenic, but we're both allright now!
# 2 30-12-2005 , 06:36 PM
Pyrus's Avatar
Subscriber
Join Date: Mar 2005
Location: Fries Fries Fries
Posts: 101
Yop GreenT,


Your problem interests me as i'll soon have some HighPoly trials from NURBS. Well, here's a screenshot of what I quicly tried here (.mb also attached)


Select Surface1 ... select Surface2 ... Nurbs>Attach surfaces.

Within the option box, check the option "Connect" rather than blend. If you leave Attach Method to Blend, your two surfaces will “melt” together rather than rigidly connect (can be handy if you want a more organic surface though).

Be also aware of the fact that attaching Nurbs from which ones isoparmsCount are different will lead in kinda drastic raise of the "final-polycount" (in case you finally convert to polys). So, as in my scene, always try using same nurbs curve as base for an extrude shape. This will prevent auto-isoparm-insert during process.
You can also use the rebuild surface to optimize your nurbs.
And last but not least, "Reverse Nurbs Surface" helps in telling to maya which (start or end) connects to the other nurbs (start or end).

user added image

As you can notice, mine is quite same as yours, except I inserted some more isoparms, then deformed part of the hulls. well, rough pipe tubes for a nice shisha I would say LOL

>> this also to remind ya about the next step in your case. Choosing CONNECT (attach option box) will generate a direct flat and simple "tube". Insert isoparms is your friend in this particular case user added image

1/ Right-click the nurbs surface you want to add isoparms
2/ select Isoparms
3/ dragAndDrop a new isoparm from a U, V or U-V cross iso to create the one needed. I mean you can add isoparms in both directions and even add a cross isoparm directly.
4/ Use shift if you want more iso to be inserted.
5/ When finished >> Nurbs curves : insert isoparms

Reshaping your Nurbs Surface is then quite easy trough the Hull Control. Right-click on Nurbs Surface, select Hull.
Then, by selecting hulls segment, you can move, rotate or scale it as needed.

Powerfull but more organic tool is the Nurbs Sculpt Tool
(Precisely the same as Poly Sculpt Tool) except it relies on surface points rather than on vertices.

>> my test scene (v7) : My scene HERE (v7)


Cheers belgian mate user added image

(lucky we got our beers up here :bandituser added image

# 3 04-01-2006 , 10:52 AM
GreenT The only one's Avatar
Registered User
Join Date: Aug 2005
Location: Belgium
Posts: 2

kind a late...

Hi Pyrus,

Million thanks to you mate and some humble :bow: 's

say, I'm very very very sorry that I'm quit late replying to your kind answer regarding my question!! Those days at the end & beginning of a year ay!

I've had some probs and very weird results with attaching two nurbs. In that case I found poly's to be more trusting. I just let the vertexes snap toghether and then combine the objects. But with nurbs... gee, what a mess user added imageuser added imageuser added image (I guess that's the 'melt' and 'connect' thing you explaned)

But to make a long answer short, you don't know how greatfull I am that you took the time to try and explane to me how I can make my humble little creation actually work!

I loved your shisha joke there 'cous it's like you felt I went on holliday to Egypt a few months ago. And shisha... I did a lot user added imageuser added imageuser added image

Hey, and thanks also for pointing that I'm able to select isoparms in both directions, 'caus most of the time I was frustrated with them 'caus I thought I could only select them in one direction.

Now, I still have a loooooooot to learn, but since I have restarted my little project about twenty times already, I can tell you that I'm moving up. Yes indeed.

as for the connection of both objects, I also found something out. When I select an isoparm and duplicate it, move the pivot to the side, and do a 90° revolve, then I also get the result I want (this I found out myself... haha, and proud he is!). Or as someone told me in an other thread (yes, I'm guilty of asking help in other forums), I duplicated several isoparms, turnded them along one point at the corner, and then did a loft.

But when I do that, the isoparms I duplicated are kind of getting in the way. (they seem to be attached to the original object... you know, in a fushia, reddish color). So the thing I do, is hide my object, then delete the duplicated isoparms that I used for the loft, and after that I show the last hidden object. Eeer, I guess I'm explaning something to myself here 'caus I don't think you need it.

Gee, I've got to stop here, 'caus otherwise I won't stop at all.

user added image Brittain rules (in culture that is!) user added image

Happy newyear, and I wish you all the best Pyrus!


I used to be a shizofrenic, but we're both allright now!
Posting Rules Forum Rules
You may not post new threads | You may not post replies | You may not post attachments | You may not edit your posts | BB code is On | Smilies are On | [IMG] code is On | HTML code is Off

Similar Threads