Ever since I can remember I've had a knack for drawing caricatures. They haven't always been great, but over the years I've managed to hone my skills a bit better and draw some pretty amusing stuff, mainly for friends and relatives, and these days it's my passion. With 2D or 3D at my fingertips I'm really up for creating any type of character!
This particular piece of work came about because I worked on ITV's CG series, Headcases, as one of the character modellers (building and correcting up to 30 out of 64 characters), and I was asked by the nice people at Simplymaya.com to create this model of the hot tempered chef, Gordon Ramsay, as a character/caricature video tutorial, explaining the process of working on an actual production, such as the Headcases series.


1. References & Sketches
For the Headcases show we actually had a character designer so I didn't have to worry about references or drawing my own concepts, as it was all done for me, but if I'm working on my own (and before the initial stages of modelling begin) I generally like to seek out some decent reference material and then have a play with some sketch ideas until I'm happy with what I'm looking at.
Reference is absolutely vital to good modelling, I can't stress this enough. I then like to seek an outside opinion or two before I commence any further.
If the audience can see who the caricature is in one go, then you know it's a winner, otherwise it's back to the drawing board! But if you are in a production then it needs to be signed off by an appropriate supervisor, or even the director himself.
2. The Modeling Begins
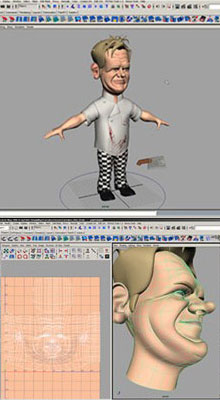
So after finalising the sketches it's time to get them loaded into Maya via the camera image planes. For this particular tutorial I began with the simple task of modelling the clothing first, so it served as a warm-up before moving into the more difficult areas, like modelling the face and its features.
Usually on a character I begin with the head so as to get a better idea of proportions, but this is a caricature or cartoon character so I was able to bend the rules a little.

With the blocking of the clothes finalised, I added more geometry to start rounding the forms out into something more recognisable. I've always been a fan of subdivisions, but since the introduction of polysmooth (keyboard 3) I tend to use this option more as it's just easier to jump from a faceted mesh to a smooth one, without the fuss of looking for a shelf command or going to the convert menu set.

Though the aim here is to create a cartoon character, it still needs to 'sell' itself to the audience, and an area that sometimes gets overlooked on some models is the thickness of certain objects. Our character is wearing clothing made of cloth and not paper, so a degree of thickness is required to make it more believable. I also cut in detail where seams would be.
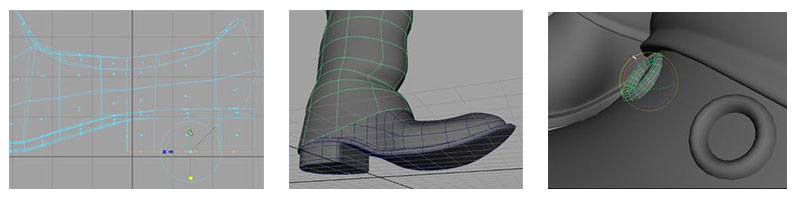
3. Modeling Boots & Upper Limb
The character needed some shoes, so where better than to start than a poly cube? Again it was a case of extruding the faces and shaping it into a cartoony-looking shoe. These were then finalised by adding eyelets created from a couple of torus' that were cut in half and positioned; the laces were created from a cut NURBS torus and shaped to fit.
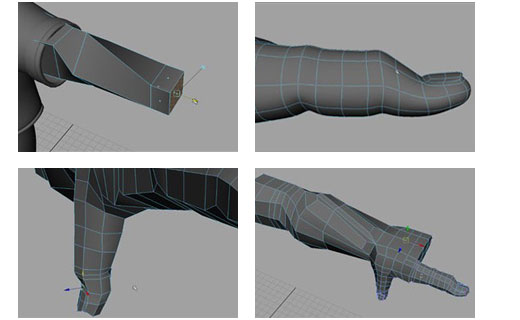
More extruding of faces was done to rough out the arms. At this stage I chose to add a little forearm twist (45 degrees) to help aid the joint twist when the character is rigged. It can save a rigger a lot of pain too when painting the weights for this area.
I added another 45 degree twist to the wrist area to bring that back into a horizontal position, ready to extrude out the hand. After adding two more edge loops to the arm the palm was then created and shaped after two more extrudes. The forefinger and thumb were the only two digits to be made here; the other fingers followed after the UVs had been created.
I try not to get bogged down with repetitive processes – especially UVs. So from the front of the palm it was 4 extrudes outwards to create the finger. The thumb was created by selecting one lower and one side poly of the palm and extruded in the same manner as the finger. The forearm then had extra geometry cut into it and shaped to resemble the tendons and muscles, leaving geometry ready for the other fingers.
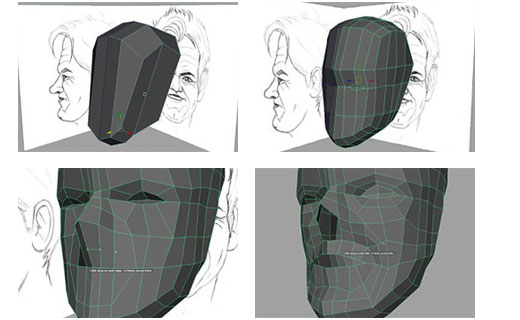
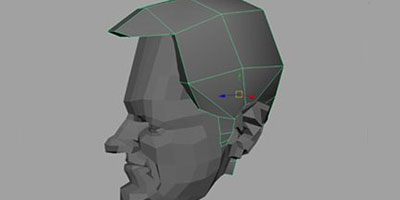
4. Head Blocking
As with the body, the modelling of the head began with the image planes being set up. Once again the trusty poly cube came into play for the modelling aspect. Again, a few splits and tweaks and the head began to take shape.
I tended to have a 'gung ho' moment and just went for broke cutting in the nasal labial and the lower lip area with one big loop; it helped me establish where I was going to place the rest of my edgeloops that would follow from the eyes and nose and the rest of the mouth. It looks jumbled right now and the geometry has more than just quads, but not for much longer…
It was time to start getting organised by getting the 'jigsaw puzzle' of the mesh to line up and get rid of the junk. The geometry was now clean enough now to begin creating more details for the eyes, lips and nose.
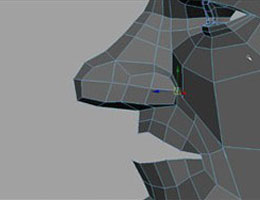
Edges were extruded for the nose tip and connected via the philtrum, followed by filling the hole where the nostrils would be and splitting the geometry to shape it up before extruding for the actual nostril, and then more extrudes for the nasal holes.
The lip area was pretty straight forward: by selecting the edges and extruding inwards toward the mouth cavity, I gave the lips the initial form, and then by adding extra loops, they were tweaked until they matched the sketches.

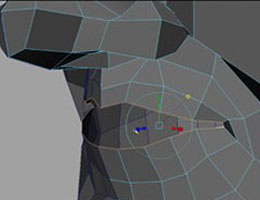

5. Modeling Human Ear
Probably the most tedious and one of the most difficult parts of any character head is modelling the ears. Well, I like to think I have this down quite well these days, as I prefer to use a method I learned about 3 years ago that incorporates a technique used on the Freedom of Teach DVD using 8 polys from the side of your characters head. Yes, 8 polys.
Faces are extruded, deleted and also spun using the spinFaces.mel (available at Highend3d.com).


6. Creating Hair
For this exercise I chose to create a hair cap from a poly plane, and then began to shape it up in the side viewport.
Following on, the hair was then shaped to fit the head. The hair strands were added from either extruding faces along a nurbs curve or simply extruding a face and shaping it.

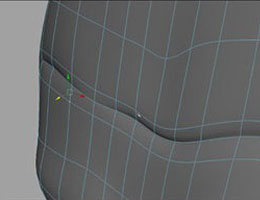
7. Detailing & UV's
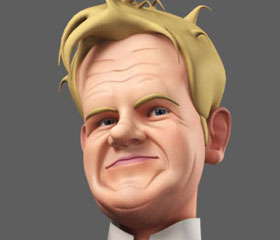
Instead of using bump or displacement maps, the forehead creases and areas around the chin were physically cut and shaped onto the model; the same was done in the production of Headcases.
Eyebrows were created and formed using our friend and saviour, the polycube.
I also added a little asymmetry to the brows as with the face to get a more characterised expression even in the default state.
As I stated earlier, I don't generally like to repeat the more

tedious tasks, such as creating UV sets or maps; here we see the forefingers' UV set complete, and then with the finger extracted from the hand it was duplicated across the rest of the palm and then attached.

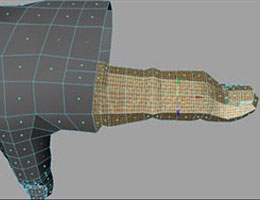

The main arm was then UV-ed. For the whole process of creating UVs for a character, I mainly use planar or cylindrical projection techniques. The same goes for the head, hair and other body parts.
8. Creating Eyes
The eyes were done with basic spheres that were duplicated and edited; the inner eye had the iris 'inverted dish' shape added, whereas the outer eye had a more bulbous iris area.
The shading for the outer eye would be transparent, using a phongE shader to allow for a better highlight.
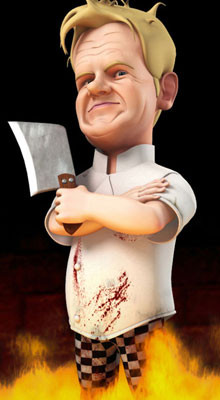
I added the meat cleaver as a more tongue in cheek nod at the character, because of his well known foul temper; this made him more threatening and psychotic looking.
9. Texturing
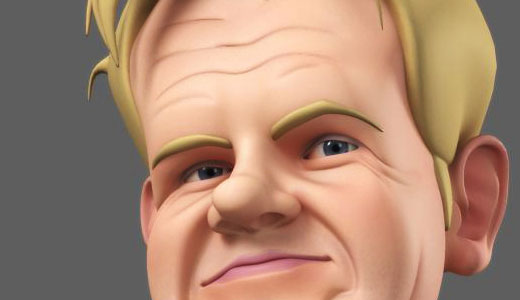
Textures were kept mostly light; some were detailed more than others, almost like Pixar's way of doing things. The skin had a light coating of various colours around the eyes, lips and cheeks along with a little '5'oclock shadow' type of stubble added for good measure.
The hands and arms were very basic with a reddish colour added to the nails and the knuckles of the fingers. The jacket was given an off white material which in turn was stained with some blood splashes and the odd scorch mark, from killing and cooking the food.
The trousers were a different kettle of fish altogether as they actually started out as Maya's chequered texture file, which I decided to bake out into its own file so I could add more grunge effects to the map.
10. Rendering & Final Image
With the characters parts all done, it was time to put it altogether and pose it up for the render. I didn't rig this in anyway but instead opted to use Maya Cluster Deformers to pose it. Once posed into position I found a suitable camera angle and then added 3 spotlights. The blinn shaders for the skin were replaced and given MISSS_fast Skin shaders and tweaked. It was then rendered using Mental Ray.
The fire was rendered separately from the figure, though I used the legs as a mask with the shader set to 'black hole' for the alpha so the flames could be comped in without the added fuss of layer masking in Photoshop.
The rest of the image was comped together with colour passes and coloured ambient occlusion passes to add to the shadow colour. The stone wall behind him was an image from my texture library which I added, distorted and re-coloured in Photoshop.
Surfing with the Alien Volume 1-3

Learn the complete VFX workflow for character creation in Maya & ZBrush, from concept to animation. More...

Read about the production of Headcases at VFX house Red Vision in London. More...
Get ten hours of video training and start building your own characters for animation inside Maya. More...