Introduction to Maya - Rendering in Arnold
This course will look at the fundamentals of rendering in Arnold. We'll go through the different light types available, cameras, shaders, Arnold's render settings and finally how to split an image into render passes (AOV's), before we then reassemble it i
# 1 26-04-2011 , 10:54 PM
Subscriber
Join Date: Jun 2008
Posts: 16

iPod earbuds - Help with lighting?

Here is a render of some older generation iPod headphones.
Im pretty satisfied with the model..
But im not sure on the lighting.. I must not have this down correctly.. lol

I used mental ray with depth map shadows. The light is an ambient light. All my materials are mental ray mats with glossiness.

Any suggestions? I'm trying to achieve realism here. user added image

I appreciate all comments!

Thanks!

Attached Thumbnails
# 2 26-04-2011 , 10:59 PM
daverave's Avatar
The thin red line
Join Date: Aug 2009
Location: England
Posts: 4,472
For one change your render settings to production...............dave


Avatar Challenge Winner 2010
# 3 26-04-2011 , 11:02 PM
Subscriber
Join Date: Jun 2008
Posts: 16
They are on production with HD 720 resolution. I always do my final renders on production setting. Maybe with a little custom additions as well.


Last edited by Eyeball08; 26-04-2011 at 11:04 PM.
# 4 26-04-2011 , 11:11 PM
daverave's Avatar
The thin red line
Join Date: Aug 2009
Location: England
Posts: 4,472
I must admit that I dont understand why it looks like you have some distortion on your wire.............dave

Edit: might be your reflections from the wire turn it down


Avatar Challenge Winner 2010
# 5 26-04-2011 , 11:34 PM
EduSciVis-er
Join Date: Dec 2005
Location: Toronto
Posts: 3,374
I would use raytracing shadows over depth map and directional lights over ambient light, but maybe that's just me. Also, that connector looks pretty tiny... should it be a bit bigger?

# 6 27-04-2011 , 12:56 AM
Chirone's Avatar
Subscriber
Join Date: Dec 2007
Location: NZ
Posts: 3,125
i hear ambient lights should never be used.
I too would use ray-traced shadows and directional lights. Unless you intended for the light to be coming from a light bulb, in which case you'd use a point light, probably not with decay as I don't think it's noticeable in a room.
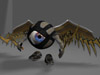
the depth map shadows are probably whats causing the distortion that dave mentioned, and on the buds themselves.
Generally you'd use depth map shadows for render previews and shadows in fog
you could also look into blurring the reflection on the floor.
One thing I notice when looking at something close to the table i'm at right now is the shadows don't have crisp edges and there is a fluorescent light bulb behind-above me. you should switch to ray traced shadows and blur the edges.
You could also look at bounce lighting too. I'm not sure how noticeable that would be from varnished wooden floor to ear buds. take a look at it in real life and see.

i agree with stwert again with the connector thing. it looks rather shriveled, you should fatten it up a bit.

I'm guessing you know how to do everything i suggested?


that's a "Ch" pronounced as a "K"

Computer skills I should have:
Objective C, C#, Java, MEL. Python, C++, XML, JavaScript, XSLT, HTML, SQL, CSS, FXScript, Clips, SOAR, ActionScript, OpenGL, DirectX
Maya, XSI, Photoshop, AfterEffects, Motion, Illustrator, Flash, Swift3D
# 7 27-04-2011 , 10:15 AM
Subscriber
Join Date: Jun 2008
Posts: 16
Thanks for the replies.
I'll go turn down any reflection i have for the cord, and replace my lights and shadows and post another render soon.

# 8 27-04-2011 , 10:27 AM
Subscriber
Join Date: Jun 2008
Posts: 16
Okay. here is another render. Using a directional light with raytracing shadows did help alot!
Thanks again for the suggestion.

I also made the connector a little larger. Looks proportional now.

I tried looking for a way to blur the shadow edges or blur the reflectivity.. and I couldn't find them in the material attributes for the floor (for the reflectivity blur) or the directional light (for the shadow blur)

any help on where those attributes are located?

Thanks again.

Attached Thumbnails
# 9 27-04-2011 , 10:35 AM
Chirone's Avatar
Subscriber
Join Date: Dec 2007
Location: NZ
Posts: 3,125
looks alot better!

Shadow blurring: select your directional light and go into the attribute editor.
you'll see under shadows ray trace shadow attributes. Increase the light angle to make the shadow edges blurrier. Increase the shadow rays to reduce the funny noise that you may get from increasing it too much.
increasing both will increase render time (although on your scene it might be insignificant)

reflection blur: i think it's in the material attributes, under mental ray. look for Mi Reflection Blur. Increasing this stuff will increase your render times

remember, when playing with these settings start off low, and increase the numbers until you're happy.


that's a "Ch" pronounced as a "K"

Computer skills I should have:
Objective C, C#, Java, MEL. Python, C++, XML, JavaScript, XSLT, HTML, SQL, CSS, FXScript, Clips, SOAR, ActionScript, OpenGL, DirectX
Maya, XSI, Photoshop, AfterEffects, Motion, Illustrator, Flash, Swift3D
# 10 27-04-2011 , 10:44 AM
Subscriber
Join Date: Jun 2008
Posts: 16
Cool. I found that setting and increasing the light angle to about 11 got the shadows blurred just enough to look nice. Thanks so much.

Found the reflection blur as well.

Now I can go back to some of my older works and touch up on them as well.

Any other comments are appreciated too!

# 11 27-04-2011 , 11:51 AM
daverave's Avatar
The thin red line
Join Date: Aug 2009
Location: England
Posts: 4,472
Looking a lot better already, you might want to but a little bump on the grain of wood it looks like glass at the moment...............dave


Avatar Challenge Winner 2010
# 12 27-04-2011 , 11:54 AM
honestdom's Avatar
The Nurb Herd
Join Date: Oct 2007
Location: London
Posts: 2,381
why are the renders so small? you said you were doing hd720.

also not sure why everyone says use ray trace shadows. depth map are just as good for something like this. try doing the ambient occlusion tutorial on here.

# 13 27-04-2011 , 12:09 PM
Gen's Avatar
Super Moderator
Join Date: Dec 2006
Location: South FL
Posts: 3,522
The "production" preset is a bit ehhh... All it really does is ramp up the AA samples and raytracing.

As far as lighting goes, I think you need to ask yourself what you want for this shot, moody vs sterile studio. While not rigidly necessary for realism, the linear lighting approach works wonders. Some Dof wouldn't hurt either.

The wood surface needs some bump and a refl map of some sort to break up the reflections. Overall I don't think the texture res is high enough to withstand this close of a shot.


- Genny
__________________
::|| My CG Blog ||::
::|| My Maya FAQ ||::
# 14 27-04-2011 , 12:19 PM
Subscriber
Join Date: Jun 2008
Posts: 16
The image is small because I shrank it. It was a HUGE pic after it was rendered. Haven't really used bumps alot, but I'll try.
I just used the first wood texture I could find for the platform. But im sure if i want to really achieve realism I would need to find a nice wood texture as this one does look a little "fake".

Thanks for the comments!


Last edited by Eyeball08; 27-04-2011 at 12:27 PM.
# 15 27-04-2011 , 06:05 PM
I would render DOF pass as well to give that pic a bit of more realism, just a small DOF though

Posting Rules Forum Rules
You may not post new threads | You may not post replies | You may not post attachments | You may not edit your posts | BB code is On | Smilies are On | [IMG] code is On | HTML code is Off

Similar Threads