Beer glass scene creation
This course contains a little bit of everything with modeling, UVing, texturing and dynamics in Maya, as well as compositing multilayered EXR's in Photoshop.
#
16
04-08-2004
, 04:37 PM
Registered User
Join Date: Sep 2003
Join Date: Sep 2003
Posts: 98
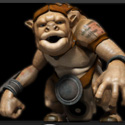
there is something weird about the horns that i can't really put my finger on. if someone could point out what makes them look a bit weird (maybe the angle?).
if u need enlarged picture just ask
#
17
05-08-2004
, 03:16 AM
Registered User
Join Date: Sep 2003
Join Date: Sep 2003
Posts: 98
#
18
05-08-2004
, 02:01 PM
Registered User
Join Date: Aug 2003
Join Date: Aug 2003
Posts: 30
#
19
05-08-2004
, 03:54 PM
Registered User
Join Date: Sep 2003
Join Date: Sep 2003
Posts: 98
was wonderin if someone could tell me what is a better way of doing this, because i'm worried maybe i can not do textures if its in this way.
#
20
05-08-2004
, 04:00 PM
Subscriber
Join Date: Jun 2002
Join Date: Jun 2002
Location: Texas
Posts: 374
#
21
05-08-2004
, 04:59 PM
Registered User
Join Date: Sep 2003
Join Date: Sep 2003
Posts: 98
 . i read some tutorials online but couldn't figure anything out. i have like month and half left to figure out how to do texturing :S
#
22
05-08-2004
, 05:00 PM

The Maya Mountain
Join Date: Aug 2002
Join Date: Aug 2002
Location: Seattle, WA
Posts: 8,245
#
23
05-08-2004
, 05:31 PM
Registered User
Join Date: Sep 2003
Join Date: Sep 2003
Posts: 98
wit very little errors. hopefully i can have enough time today post some updated screenshots.
#
24
05-08-2004
, 09:06 PM
Registered User
Join Date: Sep 2003
Join Date: Sep 2003
Posts: 98
#
25
06-08-2004
, 03:46 AM
Registered User
Join Date: Sep 2003
Join Date: Sep 2003
Posts: 98
still needs alot ALOT of work.
#
26
06-08-2004
, 07:19 AM

Subscriber
Join Date: Apr 2003
Join Date: Apr 2003
Location: Borovnica, Slovenia
Posts: 434
#
27
06-08-2004
, 02:37 PM
Registered User
Join Date: Sep 2003
Join Date: Sep 2003
Posts: 98
i was just wondering if someone could tell me how i could bend the top part of the head (where horns r coming from) so its curvy cuz thats how their heads are. i would apreciate it if someone gave me a few ways to do it.
#
28
06-08-2004
, 04:59 PM

Lifetime Member
Join Date: Feb 2004
Join Date: Feb 2004
Location: Chicago
Posts: 1,712

2 x Modeling Challenge Winner
#
29
06-08-2004
, 06:39 PM
Registered User
Join Date: Sep 2003
Join Date: Sep 2003
Posts: 98
#
30
06-08-2004
, 06:47 PM
Registered User
Join Date: Sep 2003
Join Date: Sep 2003
Posts: 98
Posting Rules Forum Rules
Similar Threads
Aug/Sept Challenge Rules and Guidelines!
by mtmckinley in forum Previous Challenges (Archives) replies 33 on 01-10-2004
Aug/Sept final NEWBIE entries!
by mtmckinley in forum Previous Challenges (Archives) replies 4 on 30-09-2004
Some Newbie, Some not-so Questions
by Phopojijo in forum Maya Basics & Newbie Lounge replies 5 on 28-09-2004
Topics


Free Courses


Full Courses


VFX News
How computer animation was used 30 years ago to make a Roger Rabbit short
On 2022-07-18 14:30:13
Sneak peek at Houdini 19.5
On 2022-07-18 14:17:59
VFX Breakdown The Man Who Fell To Earth
On 2022-07-15 13:14:36
Resident Evil - Teaser Trailer
On 2022-05-13 13:52:25
New cloud modeling nodes for Bifrost
On 2022-05-02 20:24:13
MPC Showreel 2022
On 2022-04-13 16:02:13