Introduction to Maya - Modeling Fundamentals Vol 2
This course will look in the fundamentals of modeling in Maya with an emphasis on creating good topology. It's aimed at people that have some modeling experience in Maya but are having trouble with
complex objects.
#
1
08-08-2011
, 03:04 PM
Subscriber
Join Date: Apr 2008
Join Date: Apr 2008
Location: NY
Posts: 61
not happy
https://www.trotinarallyeteam.cz/cms/...30_rs_v_01.jpg
i know my edge flow needs work but I just cant believe how bad it looks...oddly i think it looks okay in the viewport but Im severely dissapointed with the renders.
I would love to be able to get my stuff looking this good here:
https://forums.cgchannel.com/uploads/...774fullimg.jpg
but its not even close and im not talking about the materials used and the HDRI lighting just the modeling
#
2
08-08-2011
, 03:51 PM
Head of 3d Admedia
Join Date: May 2007
Join Date: May 2007
Location: nairobi , ken-ya
Posts: 1,340
#
3
08-08-2011
, 03:57 PM

Moderator
Join Date: Jan 2004
Join Date: Jan 2004
Location: Michigan, USA
Posts: 2,998
A good starting point would be the material you place on the car and murambis suggestion of using the mental ray car paint material. Then I would put a couple lights in the scene (typically a three point system - fill, bounce, backlight). Put a ground plane or sight wall in. Use the mental ray render engine.
"If I have seen further it is by standing on the shoulders of giants." Sir Isaac Newton, 1675
#
4
08-08-2011
, 04:22 PM
Head of 3d Admedia
Join Date: May 2007
Join Date: May 2007
Location: nairobi , ken-ya
Posts: 1,340
#
5
08-08-2011
, 05:55 PM
Subscriber
Join Date: Apr 2008
Join Date: Apr 2008
Location: NY
Posts: 61
#
6
08-08-2011
, 10:10 PM

Super Moderator
Join Date: Dec 2006
Join Date: Dec 2006
Location: South FL
Posts: 3,522

#
7
09-08-2011
, 12:46 AM
Subscriber
Join Date: Apr 2008
Join Date: Apr 2008
Location: NY
Posts: 61
#
8
09-08-2011
, 05:43 AM
Moderator
Join Date: Jan 2004
Join Date: Jan 2004
Location: Michigan, USA
Posts: 2,998
"If I have seen further it is by standing on the shoulders of giants." Sir Isaac Newton, 1675
#
9
09-08-2011
, 10:39 AM

The Nurb Herd
Join Date: Oct 2007
Join Date: Oct 2007
Location: London
Posts: 2,381
-create a new camera, rename it, change the focal length around, re position it, lock it.
then i would ditch the hdri you have, look for something with more studio lighting.
#
10
09-08-2011
, 05:10 PM
Subscriber
Join Date: Apr 2008
Join Date: Apr 2008
Location: NY
Posts: 61
#
11
09-08-2011
, 05:15 PM
The Nurb Herd
Join Date: Oct 2007
Join Date: Oct 2007
Location: London
Posts: 2,381
#
12
09-08-2011
, 05:17 PM
Head of 3d Admedia
Join Date: May 2007
Join Date: May 2007
Location: nairobi , ken-ya
Posts: 1,340
https://www.justinbull.ca/tutorials/studio-lighting/
#
13
09-08-2011
, 07:41 PM

Lead Modeler - Framestore
Join Date: Feb 2003
Join Date: Feb 2003
Location: UK
Posts: 6,287
its a good effort but by adding another 25% effort into the model I think it will be there pretty much. really it needs edges to sharpen areas up a bit. Modelling anything in a realistic manner really does require some hardcore observations and not just following a plan of something. I think by doing what Ive said you'll get there. Also take an approach one step at a time, get the model in shape first, then move to textures then lighting, dont try to cram it all in at once, theres enough to get right with the model and understanding the forms etc of that before moving into rendering etc. Theres plenty of people here to help you along....
cheers
Jay
#
14
09-08-2011
, 09:59 PM
Subscriber
Join Date: Apr 2008
Join Date: Apr 2008
Location: NY
Posts: 61
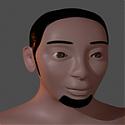
Thanks for the advice Jay. About the sharpening of the edges, I initially had much sharper edges that was closer to what is realistic but it just seemed off...obviously here I have yet to combine and merge the two sides but you get the idea. Is there a better way to smooth it out without averaging the vertices or the smooth scult tool? I suppose I could try softening the normals...Dude
its a good effort but by adding another 25% effort into the model I think it will be there pretty much. really it needs edges to sharpen areas up a bit. Modelling anything in a realistic manner really does require some hardcore observations and not just following a plan of something. I think by doing what Ive said you'll get there. Also take an approach one step at a time, get the model in shape first, then move to textures then lighting, dont try to cram it all in at once, theres enough to get right with the model and understanding the forms etc of that before moving into rendering etc. Theres plenty of people here to help you along....
cheers
Jay
Last edited by jjmacky88; 09-08-2011 at 10:04 PM.
#
15
09-08-2011
, 11:48 PM
Lead Modeler - Framestore
Join Date: Feb 2003
Join Date: Feb 2003
Location: UK
Posts: 6,287
cheers
Jay
Posting Rules Forum Rules
Similar Threads
Happy Christmas!
by gster123 in forum Maya Basics & Newbie Lounge replies 13 on 25-12-2008
Happy Easter
by R-Tillery in forum Maya Basics & Newbie Lounge replies 2 on 13-04-2004
Happy Birthday Mikey
by Kevin in forum Maya Basics & Newbie Lounge replies 20 on 04-12-2003
HAPPY BIRTHDAY RAGE
by Kevin in forum Maya Basics & Newbie Lounge replies 13 on 10-10-2003
Happy Birhtday Kreed_UK
by Kevin in forum Maya Basics & Newbie Lounge replies 7 on 26-09-2002
Topics


Free Courses


Full Courses


VFX News
How computer animation was used 30 years ago to make a Roger Rabbit short
On 2022-07-18 14:30:13
Sneak peek at Houdini 19.5
On 2022-07-18 14:17:59
VFX Breakdown The Man Who Fell To Earth
On 2022-07-15 13:14:36
Resident Evil - Teaser Trailer
On 2022-05-13 13:52:25
New cloud modeling nodes for Bifrost
On 2022-05-02 20:24:13
MPC Showreel 2022
On 2022-04-13 16:02:13