
Introduction to Maya - Rendering in Arnold
This course will look at the fundamentals of rendering in Arnold. We'll go through the different light types available, cameras, shaders, Arnold's render settings and finally how to split an image into render passes (AOV's), before we then reassemble it i
#
16
08-06-2005
, 11:28 PM
Subscriber
Join Date: Nov 2004
Join Date: Nov 2004
Location: In the middle of nowhere in VA
Posts: 749
#
17
08-06-2005
, 11:43 PM

Registered User
Join Date: Oct 2003
Join Date: Oct 2003
Location: florence OR, USA
Posts: 958
I am creating an illusion.
Homepage https://www.freewebs.com/vedickings/index.htm
Challenge WIP https://forum.simplymaya.com/showthre...threadid=17391

#
18
10-06-2005
, 08:59 PM

Subscriber
Join Date: Oct 2003
Join Date: Oct 2003
Location: Brantford Ontario Canada
Posts: 43


Think Twice Split Poly Once
#
19
10-06-2005
, 09:13 PM

Lead Modeler - Framestore
Join Date: Feb 2003
Join Date: Feb 2003
Location: UK
Posts: 6,287
Dude, although this model is not your design, I really love this particular piece of modelling. You can tell its a good clean mesh under there. I have no crit really except add a pilot will you!!
Look forward to the rest
_J
#
20
10-06-2005
, 11:06 PM
Subscriber
Join Date: Oct 2003
Join Date: Oct 2003
Location: Brantford Ontario Canada
Posts: 43
Yeah I intend to model the inside of the cockpit, with pilot seat, joystick, computer controls etc...I'm saving it for last gotta think about it. perhaps I'll take your advice and add a pilot, or at least a semblance of one...
I', also thinking about landing gear. That's gonna be a tuff one. I want to be able to animate it te landing gear so I'm going to have to think about how that's going to work...
That'll take me into realm of maya I'm not familar with yet. As I stated in the beginning just converting over from 3dmax, if this was max no problem but I got to get more familiar maya still only been a month or so..but I've modeled in max for several years, so some of the transition has just been learning maya specific tool sets..
Think Twice Split Poly Once
#
21
11-06-2005
, 05:06 AM

Subscriber
Join Date: Mar 2003
Join Date: Mar 2003
Location: UK- Wirral - near Liverpool
Posts: 209
There are many ways to animate the landing gear
Below is a link for a tutorial on modelling a spaceship and animating it. Its an old one and is a traditional way of animating using maya. You dont need the spaceship part etc as you are way beyond what this guy has made.
The bits you will like is the part on animating the landing gear and firing some photons from it. Just skip the first couple of chapters.
https://www.tutorialized.com/tutorial...spaceship/4675
Set Driven Key is the best way of animating the landing gear.. look at the free tutorial Here on SImplymaya, that explains this principle.
https://simplymaya.com/movie_pages/tu...html?tut_id=41
BTW.. you still need to add some lights in your renders...
Buy a point and spend it on this tutorial
https://simplymaya.com/movie_pages/tu...html?tut_id=23
Or google for a free one
#
22
11-06-2005
, 05:48 AM

Registered User
Join Date: Mar 2003
Join Date: Mar 2003
Location: San Francisco, CA
Posts: 72
I would use expressions. You can easily set it up so that the gear mesh Y-axis position directly effects the landing gear covers Rotation. So when you grab the wheel meshes and pull them down, the gear covers automatically rotate out and let the wheels pass by.
Using expressions would eliminate the need to animate the gear covers individually. Just animate the wheels and the expression does the rest

Edit:
Meh, Looking at it again, Set Driven keys would work as well, you just have to set three objects to the attribute. It would essentially function exactly the same why using either solution. Whatever you like best
"On the other hand... the early worm gets eaten."
Last edited by scopa; 11-06-2005 at 05:51 AM.
#
23
11-06-2005
, 08:42 AM

Registered User
Join Date: Jun 2003
Join Date: Jun 2003
Location: Johannesburg
Posts: 641
Decent looking model you have there. Keep it up

-------------------------------------------
#
24
11-06-2005
, 08:40 PM
Subscriber
Join Date: Oct 2003
Join Date: Oct 2003
Location: Brantford Ontario Canada
Posts: 43
Thanks for the landing gear tips, having it behave just like you mentioned using the expressions way is exactly how I wanted everything to behave so I'll check it out..
Yeah I know I got to set up some temp lights for renders, I'll make sure I do that for my next update.
Think Twice Split Poly Once
#
25
16-06-2005
, 08:57 PM
Subscriber
Join Date: Oct 2003
Join Date: Oct 2003
Location: Brantford Ontario Canada
Posts: 43
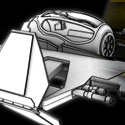
I added in some temp lights just to help show definition don't go crazy, these were just thrown in, hence the term temp lights.
Anyways it shows some of the greebling I'm doing as I detail out more of this model. Still working on greeblin out the back engines not to sure if I like it yet..your comments will help..


thanks, Grayth
Think Twice Split Poly Once
#
26
16-06-2005
, 10:43 PM
Registered User
Join Date: Jul 2004
Join Date: Jul 2004
Location: Northern California
Posts: 445
Dave
#
27
17-06-2005
, 12:54 AM
Subscriber
Join Date: Oct 2003
Join Date: Oct 2003
Location: Brantford Ontario Canada
Posts: 43
thanks,
Think Twice Split Poly Once
#
28
18-06-2005
, 02:34 AM
Subscriber
Join Date: Oct 2003
Join Date: Oct 2003
Location: Brantford Ontario Canada
Posts: 43
As you can see I started greeblin the ass end now


Grayth
Think Twice Split Poly Once
#
29
18-06-2005
, 12:39 PM
Subscriber
Join Date: Mar 2003
Join Date: Mar 2003
Location: UK- Wirral - near Liverpool
Posts: 209
Cheers
#
30
18-06-2005
, 02:27 PM
Subscriber
Join Date: Oct 2003
Join Date: Oct 2003
Location: Brantford Ontario Canada
Posts: 43
While I am using smooth proxy, for the most part I have not used it on detailing up the mesh. In the engine detail case it's all done and sorry there is no low poly version of it.
It's real simple actually though I took a cylinder I think of around 12 segements, deleted the ends as you can't see them anyways...I applied smooth the the polys but oly with a division of 2 just to give me more mesh to work with..
I then selected a row of faces and then delected every other one, extruded with the usual 3 times standard to get proper smoothing...then used cut faces tool to cut on each side of this row of polys and through the extruded polys..making sure that I have 3 edges for each 90 degree turn in a mesh.
I then added in another poly smooth but with a division of only 1 this time..
It's the same method I used on blocking out the detail, split poly tool and cut faces but in greeblin out details sometimes you need to smooth out the poly first to give you more faces to play with...
Hope that helps..
Grayth
Think Twice Split Poly Once
Posting Rules Forum Rules
Similar Threads
Battlestar Galactica Colonial Viper MKII
by ctbram in forum Work In Progress replies 85 on 23-01-2010
Astronomy modeling and Spaceship modeling
by sprudhom in forum Maya Basics & Newbie Lounge replies 3 on 08-05-2009
First car - Dodge Viper WIP
by Rhetoric Camel in forum Work In Progress replies 41 on 03-06-2007
Spaceship
by bobalie in forum Maya Basics & Newbie Lounge replies 16 on 01-05-2007
Simple Spaceship scene.
by twisteddragon33 in forum Finished Work replies 2 on 05-09-2004
Topics


Free Courses


Full Courses


VFX News
How computer animation was used 30 years ago to make a Roger Rabbit short
On 2022-07-18 14:30:13
Sneak peek at Houdini 19.5
On 2022-07-18 14:17:59
VFX Breakdown The Man Who Fell To Earth
On 2022-07-15 13:14:36
Resident Evil - Teaser Trailer
On 2022-05-13 13:52:25
New cloud modeling nodes for Bifrost
On 2022-05-02 20:24:13
MPC Showreel 2022
On 2022-04-13 16:02:13