Substance Painter
In this start to finish texturing project within Substance Painter we cover all the techniques you need to texture the robot character.
#
1
16-06-2009
, 06:14 AM
Registered User
Join Date: May 2009
Join Date: May 2009
Posts: 7
Modeling Question
I have used solidworks but now interested in animation and better rendering so needing a bit of product designer modeling skill in maya.
I am not too familiar with poligonal modeling and so on.. please help.
(I posted a question at such a maya website in japan but never got any replies..)
Straight to the point, I want to model a product in the attacehd picture.
it is a wearable acryric accessary like a bracelet. It has lots of holes inside to outside which to have a coloured strings going thru to decorate in different variations.
so I think of the modeling steps i have been trying (no progress yet thou..)
1, Make a box (poligon? surface??)
2, lots of circles are projected to the both surfaces
(is it possible?? or should i use Boolean cut?)
3, delete the projected circular surfaces on the box and creat
newsurfaces between the little circles.
4, Bend the whole model (using wire deformer?? i wanna bend it inperfect circle like to be worn on arms ) and done!!
This is alomost same as the process of making it in real as a plastic product. little holes are getting bigger as come out side of the ring.
I am dying to know how these steps shoud be done using what kind of great tools in maya..
Please coment me or Intro me a great tutorial!
Thank you for your time and sorry for my poor English.
Marc
Last edited by nmasatake; 16-06-2009 at 06:23 AM.
#
2
16-06-2009
, 06:25 AM
Registered User
Join Date: May 2009
Join Date: May 2009
Posts: 7
#
3
16-06-2009
, 02:43 PM

Super Moderator
Join Date: Dec 2006
Join Date: Dec 2006
Location: South FL
Posts: 3,522
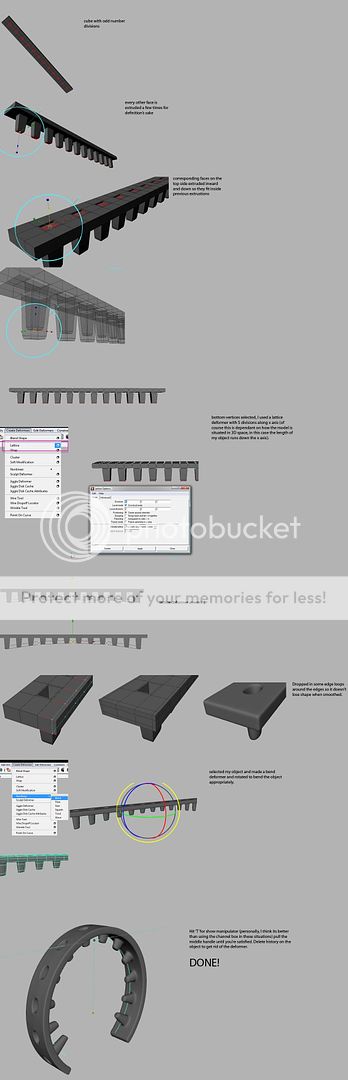
Hope that helps.

#
4
16-06-2009
, 03:26 PM

Technical Director
Join Date: Feb 2004
Join Date: Feb 2004
Posts: 2,988
After doing that, to create the other side, you must delete the faces on one side. Then you must duplicate the object, and move it to the side, and flip it so that the open faces are facing each other. Then you must combine the two objects, and merge the vertices together to create both sides of the mesh.
Have a great day!
Imagination is more important than knowledge.
#
5
17-06-2009
, 02:49 AM
Registered User
Join Date: May 2009
Join Date: May 2009
Posts: 7
This is so much more than I expected!! THANKS!
Now I understood that the deformer is the way to go.
and about the holes, so if i am not having these pointy things coming inwards but just holes going thru like the attached picture, (actually you have done it much into much harder shape) um,, i think i can work it out ! i do your tutorial first then i will try the desired shape!!
NextDesign san! (ho, you know japanese??), thanks i think i am not up to that stage yet so i will try it when im up to it!!
thanks guys let me work hard on it cheers~~
nmasatake
#
7
17-06-2009
, 04:04 AM
Super Moderator
Join Date: Dec 2006
Join Date: Dec 2006
Location: South FL
Posts: 3,522
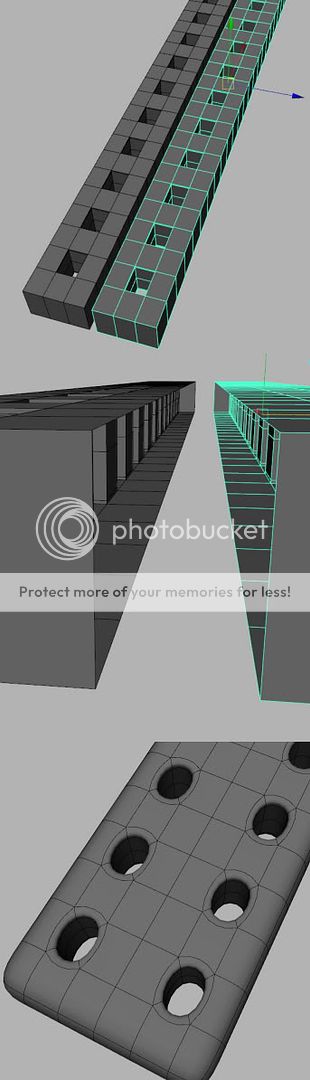
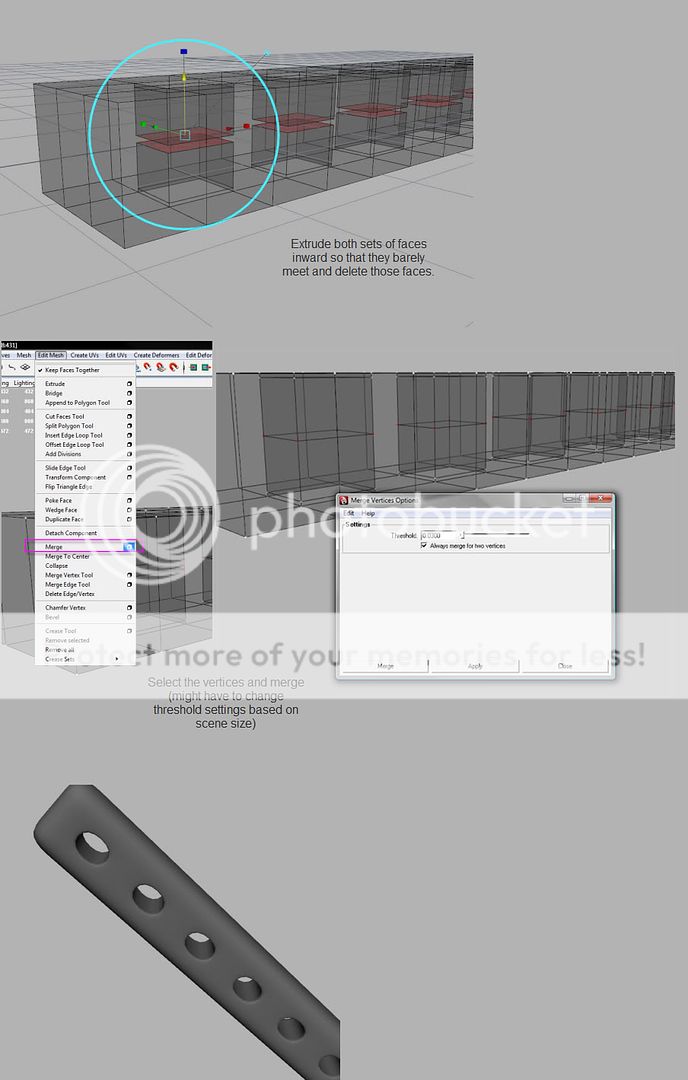
From the sketch, its basically the same as the first few steps, instead you extrude both sides inwards. Deleting faces, and merging verts like above.
#
8
17-06-2009
, 09:23 AM
Registered User
Join Date: May 2009
Join Date: May 2009
Posts: 7
wow... amazing.. and your presentation is very expert.
Yeah I think you are very creative to make that first tutorial too!
it is very clear so thank you tons I will try after work!!!
cant waittttt to finish this damn aftereffects stufff(my work atm) and get onto maya

#
9
17-06-2009
, 01:24 PM
Super Moderator
Join Date: Dec 2006
Join Date: Dec 2006
Location: South FL
Posts: 3,522
Oh stop you're making me blush :blush: Glad I could help and good luck.Originally posted by nmasatake
GecT!
wow... amazing.. and your presentation is very expert.
Yeah I think you are very creative to make that first tutorial too!
it is very clear so thank you tons I will try after work!!!
cant waittttt to finish this damn aftereffects stufff(my work atm) and get onto maya
#
10
18-06-2009
, 08:34 AM
Registered User
Join Date: May 2009
Join Date: May 2009
Posts: 7
I did your first tutorial and moved onto the second so went almost smoothly.
There is a new problem which is mirroring the object and smoothing.
I have that bit of not wanted shaped (please see the attached pic)
coz I mirrored the first top to the bottom?

or could I just combine the object after using Duplicate spacial tool?
Thank you for your time
#
11
18-06-2009
, 02:59 PM
Super Moderator
Join Date: Dec 2006
Join Date: Dec 2006
Location: South FL
Posts: 3,522
#
12
19-06-2009
, 06:13 AM
Technical Director
Join Date: Feb 2004
Join Date: Feb 2004
Posts: 2,988
はい。私は少し日本語を話します。私は来年の夏、日本に行くことがあります。私は日本の友人が 多い。
(Yes. I speak a little Japanese. Next summer I may go to Japan. I have many friends in Japan.)
Yes, it looks like you had some non-quad geometry before you smoothed.
Imagination is more important than knowledge.
#
13
19-06-2009
, 06:25 AM
Registered User
Join Date: May 2009
Join Date: May 2009
Posts: 7
“ú–{‚É‚Í—·s‚ÅsE‚Ì‚Å� �·‚©HH
I have sorted! just mirroring with the function of not merging the vert.
looks ok for now but for my info, what do you mean by merging verts. do i have to merg everyone of them?
what is the difference Merge vert and simply Conbine the object??

Last edited by nmasatake; 19-06-2009 at 06:28 AM.
#
14
19-06-2009
, 01:07 PM
Super Moderator
Join Date: Dec 2006
Join Date: Dec 2006
Location: South FL
Posts: 3,522
Originally posted by nmasatake
...what do you mean by merging verts. do i have to merg everyone of them?what is the difference Merge vert and simply Conbine the object??
..
You don't have to do them one by one, if they are similarly spaced apart then could select them all and set the merge threshold, that will tell Maya to merge verts that are only within X distance of each other
The combine operation simply unites geometry into a new singular object, it does nothing to actually close gaps. Merge verts closes gaps, but will not work if the verts belong to separte objects.
#
15
19-06-2009
, 01:23 PM

The Nurb Herd
Join Date: Oct 2007
Join Date: Oct 2007
Location: London
Posts: 2,381
i don't think you need to say watashi so muchOriginally posted by NextDesign
masatakeーさん。
はい。私は少し日本語を話します。私は来年の夏、日本に行くことがあります。私は日本の友人が 多い。
(Yes. I speak a little Japanese. Next summer I may go to Japan. I have many friends in Japan.)
Yes, it looks like you had some non-quad geometry before you smoothed.

Posting Rules Forum Rules
Similar Threads
Character Modeling Question
by Xenophanes in forum Maya Modeling replies 4 on 25-03-2014
Question about modeling
by Ozgalis in forum Maya Basics & Newbie Lounge replies 2 on 18-10-2009
maya question about modeling
by punk_111 in forum Maya Basics & Newbie Lounge replies 13 on 09-09-2008
modeling question
by brandy_ke in forum Maya Basics & Newbie Lounge replies 2 on 16-02-2007
Question on Patch Modeling Heads.
by bubbleme80 in forum Maya Basics & Newbie Lounge replies 2 on 21-03-2005
Topics

Free Courses


Full Courses


VFX News
How computer animation was used 30 years ago to make a Roger Rabbit short
On 2022-07-18 14:30:13
Sneak peek at Houdini 19.5
On 2022-07-18 14:17:59
VFX Breakdown The Man Who Fell To Earth
On 2022-07-15 13:14:36
Resident Evil - Teaser Trailer
On 2022-05-13 13:52:25
New cloud modeling nodes for Bifrost
On 2022-05-02 20:24:13
MPC Showreel 2022
On 2022-04-13 16:02:13