Introduction to Maya - Rendering in Arnold
This course will look at the fundamentals of rendering in Arnold. We'll go through the different light types available, cameras, shaders, Arnold's render settings and finally how to split an image into render passes (AOV's), before we then reassemble it i
#
16
13-01-2007
, 09:41 PM

Subscriber
Join Date: Feb 2006
Join Date: Feb 2006
Location: London
Posts: 703
heres a simple gi render. do wish i knew more about it. can get impressive results.
A pint of example is worth a gallon of advice!!
#
17
14-01-2007
, 04:32 PM

Subscriber
Join Date: Jan 2007
Join Date: Jan 2007
Posts: 86
I was going to get that tutorial until the other guy said about how the tutorial wasn't teaching how to make a clean model. I'm a beginner and so I want a tutorial to teach me good habits, but even still, this is looking fantastic. Good work!
#
18
14-01-2007
, 07:36 PM
Registered User
Join Date: Feb 2005
Join Date: Feb 2005
Location: This Place
Posts: 220
13th - looks good. I don't think some of my designs are that complicated.... but then, they're my designs (graah.... I need to finish that bug). be good to see how the rest turns out.
Book Wise
https://X4nd5r.deviantart.com
#
19
19-01-2007
, 09:18 AM
Subscriber
Join Date: Feb 2006
Join Date: Feb 2006
Location: London
Posts: 703
A pint of example is worth a gallon of advice!!
#
20
19-01-2007
, 09:20 AM
Subscriber
Join Date: Feb 2006
Join Date: Feb 2006
Location: London
Posts: 703
A pint of example is worth a gallon of advice!!
#
21
19-01-2007
, 09:22 AM
Subscriber
Join Date: Feb 2006
Join Date: Feb 2006
Location: London
Posts: 703
A pint of example is worth a gallon of advice!!
#
22
19-01-2007
, 10:58 AM

Moderator
Join Date: May 2005
Join Date: May 2005
Location: Manchester Uk
Posts: 6,300
Good going.
"No pressure, no diamonds" Thomas Carlyle
#
23
22-01-2007
, 08:45 AM

Registered User
Join Date: Dec 2004
Join Date: Dec 2004
Location: Sweden
Posts: 48
 .
.
#
24
22-01-2007
, 02:43 PM
Subscriber
Join Date: Jan 2007
Join Date: Jan 2007
Posts: 86
If you had a spare minute, would you mind telling us how to set up a GI render like that? I think I'd use that instead of a clay render if I knew how, it looks much better

#
25
22-01-2007
, 04:37 PM

Registered User
Join Date: Jun 2005
Join Date: Jun 2005
Location: t-dot
Posts: 646
#
26
22-01-2007
, 07:49 PM
Registered User
Join Date: May 2006
Join Date: May 2006
Location: Hastings UK
Posts: 895
Can't wait to see more on this.
#
27
23-01-2007
, 07:01 AM
Subscriber
Join Date: Feb 2006
Join Date: Feb 2006
Location: London
Posts: 703

about the gi render zeroalarm. first off you need to get the gi plugin from highend3d.com for example. then you unzip the files and put it in your plugins folder in the maya folder. which by default is in my documents. you know what it'll save my hands some aching if you watch the tutorial instead explaing everything on text. https://3d-palace.com/index.php?page=tut1. go to the maya section then the gi solution. then download all 3 parts. he'll show you how to make the gi render. its takes alot of adjusting to make the render just right though.
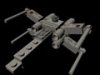
okaaaay. heres another update. the engine block. i checked out how the arm section. its looks quite complex. cant wait.
A pint of example is worth a gallon of advice!!
Last edited by 13th_resident; 23-01-2007 at 07:04 AM.
#
28
23-01-2007
, 07:05 AM
Subscriber
Join Date: Feb 2006
Join Date: Feb 2006
Location: London
Posts: 703
A pint of example is worth a gallon of advice!!
#
29
23-01-2007
, 07:24 AM
Subscriber
Join Date: Jan 2007
Join Date: Jan 2007
Posts: 86
The engine looks great, keep it up!
#
30
27-01-2007
, 05:17 AM
Subscriber
Join Date: Feb 2006
Join Date: Feb 2006
Location: London
Posts: 703
A pint of example is worth a gallon of advice!!
Posting Rules Forum Rules
Similar Threads
Building a Mech
by misterjackson in forum Work In Progress replies 87 on 17-04-2013
Toy Story 3 3D Review
by stwert in forum Maya Basics & Newbie Lounge replies 1 on 28-06-2010
3D vs 3D
by stwert in forum Maya Basics & Newbie Lounge replies 2 on 16-04-2010
3d palace
by sfowler63 in forum Resource Lounge replies 0 on 22-09-2008
Why Maya?
by haka in forum Maya Basics & Newbie Lounge replies 21 on 10-11-2007
Topics

Free Courses


Full Courses


VFX News
How computer animation was used 30 years ago to make a Roger Rabbit short
On 2022-07-18 14:30:13
Sneak peek at Houdini 19.5
On 2022-07-18 14:17:59
VFX Breakdown The Man Who Fell To Earth
On 2022-07-15 13:14:36
Resident Evil - Teaser Trailer
On 2022-05-13 13:52:25
New cloud modeling nodes for Bifrost
On 2022-05-02 20:24:13
MPC Showreel 2022
On 2022-04-13 16:02:13