Maya for 3D Printing - Rapid Prototyping
In this course we're going to look at something a little different, creating technically accurate 3D printed parts.
#
1
20-11-2007
, 08:48 AM
Subscriber
Join Date: May 2005
Join Date: May 2005
Posts: 54
BLOOD ANGELS DREADNOUGHT WH40K
Dreadnought
The actual modelling is finshed, but as you can see from the front detailing I have been messing about with some displacement mapping, first time I have tried this, the map is just layed on the object as a whole, so I need to lay out the UV's for that. I did an extrude after the map was applied so that needs sorting as well.
I plan to model some weapon variations as well, then hopefully rig it.
Mick
Last edited by Wraithe; 14-06-2008 at 02:03 PM.
#
2
20-11-2007
, 02:04 PM

Registered User
Join Date: May 2007
Join Date: May 2007
Location: Egypt
Posts: 129
You Deserve
#
3
05-12-2007
, 12:52 AM
Subscriber
Join Date: May 2005
Join Date: May 2005
Posts: 54
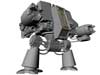
Dreadnought Finished
Here are a few images of the different versions.


I created a full gallery of these models, on my website with different views and the different weapon variations. If you are interested in viewing them then click the link below
The Graffix Tablet
Although it looks like there are 3 models, all I did was modelled the weapons on different display layers, and seperated them into different groups, then all the animator has to do is select which dreadnought he wants to animate and turn on the relevant layers. When it is rigged, it will be 1 rig controlling everything. The only time I created more than one model was for the first image.
Hope you like it.
Mick
Last edited by Wraithe; 28-12-2007 at 02:38 AM.
#
4
05-12-2007
, 01:29 AM

As Zbrushiac sounds stupid!
Join Date: Nov 2007
Join Date: Nov 2007
Location: Derby
Posts: 1,241
Really nice work.
Did you use the Dreadnought tutorial at 3D Buzz??? Theres seems to be a ton of people modeling them over there.
Good job

www.stevenegan-cgi.com
"Your weapons are no match for ours! People of Mars, surrender!"
"Um, this isn't Mars. This is Earth."
"Earth? Earth-with-nuclear-weapons Earth?"
"Yes."
[long pause] "Friend!!"
#
5
05-12-2007
, 01:34 AM
Subscriber
Join Date: May 2005
Join Date: May 2005
Posts: 54
Model Miniatures
Mick
#
6
14-06-2008
, 02:07 PM
Subscriber
Join Date: May 2005
Join Date: May 2005
Posts: 54
Now for the texturing

This is the main body laid out, my mate pointed out that it looked like what automatic mapping would do, but most of that was planar mapped, admittedly I could have laid them out better, he also asked why I didn't seem most of it together, for instance the 2 edges specified by the arrows, well........ if I did this, I would have a load of UV's overlapping as shown below

Also sew everything? Given the angles that some of the edges are at, it is harder to draw the lines in photoshop and they would go off in all angels as shown below

So I explained by laying them out the way I did, if I ever want some panelling that goes round the model all I have to do is, in Photoshop, copy what was in the green square in the first image, rotate it anticlockwise and paste it near the second edge and its a simple matter of lining it up correctly. in hind sight I could have laid them out with the shells as near as paossible to each other as follows

Then all I would have to do is either move the UV's slightly up or down, or move that part of the texture in PS.
Another thing discussed was how much detail I could fit on any one part of the model, you can see by the following layout that parts of the model are extremely small.

So when in PS and you zoom in it would look something like this

Now with this I would struggle to get any serious detail in there, but as these are extremely small parts of the model during any sort of movie they wouldn't be noticed and they will only have basic texturing on them. The only way past this that I can see would be to have all these parts of the model in there own UV spaces as follows

But then I would end up with a shed load of shaders.
When I create the snapshot I created them at 4083 x 4083 with 72dpi,

I upped the dpi in PS from the standard 72dpi to about 300dpi,

so now I can get that finer detail, but the file res ends up like 17013 x 17013 and file size of 829mb, lol, so I binned that idea.
So far there are 17 shaders, the main body, body detail (pipe entry points ect), the smoke launcher, the concrete slab on the front of the body, the hips, L leg, R leg, 7 weapons, all the pipes and finally all the metal (pistons and ammo pipes).
So in short, would I be best having all these little model details and extrusions in their own UV space? Ending up with possibly hundreds of shaders.
What resolution and dpi should I snapshot and should I alter it in PS?
Any comments and advice would be appreciated.
Thx
Mick
Last edited by Wraithe; 14-06-2008 at 02:14 PM.
#
7
14-06-2008
, 04:59 PM
As Zbrushiac sounds stupid!
Join Date: Nov 2007
Join Date: Nov 2007
Location: Derby
Posts: 1,241
It would be ideal to store all of these on a 1024 x 1024 Texture. All the weapons will have there own UV set. Possibly only 512 x 512 As they are allot smaller than the other body parts. As for all the greebles you can put them on they're own Texture.
This will result in about 5 or 6 textures for the final model. BUT everything will be in high detail and everything will have an even resolution.
Plus I don't know about you, but my computer would DIE if I tried to edit a 17,000 x 17,000 pixel image in PS... Let alone loading it into Maya....
Anyway, good luck
www.stevenegan-cgi.com
"Your weapons are no match for ours! People of Mars, surrender!"
"Um, this isn't Mars. This is Earth."
"Earth? Earth-with-nuclear-weapons Earth?"
"Yes."
[long pause] "Friend!!"
#
8
14-06-2008
, 08:57 PM
Subscriber
Join Date: May 2005
Join Date: May 2005
Posts: 54
I was wondering just how far I should take the layouts, I mean all the detail like the pipe entry and exit rings and a few other little gubbins are already on their own layouts. But there are still parts of the model that are extrusions of the main body, and as they are small as well I was wonderin if I shouldn't put them on a separate UV layout as well.So far there are 17 shaders, the main body, body detail (pipe entry points ect), the smoke launcher, the concrete slab on the front of the body, the hips, L leg, R leg, 7 weapons, all the pipes and finally all the metal (pistons and ammo pipes).
Cheers for the input though.
512 x 512? Would that be enough to get detail? In the last image of my post the pixels look blocky and that was at 4083 x 4083.
Mick
Last edited by Wraithe; 01-07-2008 at 04:31 PM.
#
9
01-07-2008
, 04:34 PM
Subscriber
Join Date: May 2005
Join Date: May 2005
Posts: 54


#
10
01-07-2008
, 04:35 PM
Subscriber
Join Date: May 2005
Join Date: May 2005
Posts: 54


SHADERS - As the dreadnought has multiple weapon variations I have only texured the 2 powerfists you see. But overall there are 17 shading networks. A typical shading network for each part of the model is shown below.

A blinn shader with a layered texture node. This particualr shading network is for the main body. It has a base layer of red, with the odd black bit. The second layer is a dirt layer, on the advice of the old mech tut I hunted out a metal surface image and used that. The other 3 files are the decals (Black Blood Angel Wings, the yellow vehicle number and Black Imperial Eagle). Although this is th initial colouring I'm not happy with it, I think the red is too bright, in some of the images you can't see the dirt layer properly. And I don't like the metal surfaces.
LIGHTING - I have used the same lighting as I did for the clay renders, in some images this is making the model look too bright from certain angles, but I don't think I want to alter them so I'll have to darken the textures in photoshop or mess about with the colour balance in maya.
IN SHORT - I need to darken the red base colour, mess about with the dirt layer abit more, I might use the dodge and burn tools to do this. I have to alter the metal surfaces again but I'd like some advice on this please. I also have to add some battle damage, some bullet holes, impact hits and the decals.
Any comments on the overall renders would be appreciated
#
11
06-07-2008
, 07:22 PM
Subscriber
Join Date: May 2005
Join Date: May 2005
Posts: 54
Just working on the main upper body for now. I added some pipes to the front which I totally forgot to model.
Anyway, the dirt layer was the main thing to sort out so I used the burn tool in Photshop and put some extra dirt where I thought it would settle in real life, I might have to do abit more?!?!? I also messed with the decals using the quick mask and spatter filter. Then to get the worn paint I simply cut holes in the base red layer, gave it an inner bevel and a drop shadow. Not too sure I like this though. The last thing I messed with was the bump map, not too much though, just a couple on the top and the rivets around the edges. Oh yeah and I changed my metal shader, I robbed a silver shader from High End and changed a few settings. I still have to look at that some more as it is too reflective, but seeings there is a ramp mapped to the reflectivity attrib it won't let me change it even if I break the connection, change and reconnect.
These were software rendered.


Anyway, would love some comments/advice before I go ahead and texture the rest of the model.
Thanks
Mick
#
12
13-07-2008
, 07:17 AM
Subscriber
Join Date: May 2005
Join Date: May 2005
Posts: 54
Final Renders


TEXTURING - Well, it's been a long time in the making, I have to say, I hate UV mapping, but I did like painting the model though, it's not perfect but not bad for my first serious attempt at texturing.
METAL - Although the metal looks nice and clean, I'm not happy with it, it's too reflective and I'm not sure how to mess around with the ramp node to get it right. Also I might add a different metal for the gun barrels, I want them a dark black metal colour like real weapons.
SCRATCHED PAINT - Not too happy with the scratched paint. Basically I had a base grey colour, then the base red paint colour. In photoshop I cut holes in the red paint and gave it a dro shadow. I did also give it a bevel but it looked too deep even at low settings.
SPECULAR - I left out the specular mapping, when I did it, I followed the Mech tut, but my specular maps looked horrible, you could blatantly see them on the model so I removed them. Some more practice needed there I think.
Other than that I pretty much like it. Any comments crits n tips would be appreciated.
Next step.......... Rigging :attn:
Mick
Last edited by Wraithe; 13-07-2008 at 07:19 AM.
Posting Rules Forum Rules
Similar Threads
Dreadnought 40K W.I.P.
by dbsmith in forum Work In Progress replies 5 on 25-08-2008
warhammer 40k dreadnought wip
by ctbram in forum Work In Progress replies 16 on 17-05-2007
WH40K Dreadnought
by TreyZ32 in forum Finished Work replies 10 on 05-04-2005
Warhammer 40K Dreadnought
by TreyZ32 in forum Work In Progress replies 33 on 16-10-2004
Topics


Free Courses


Full Courses


VFX News
How computer animation was used 30 years ago to make a Roger Rabbit short
On 2022-07-18 14:30:13
Sneak peek at Houdini 19.5
On 2022-07-18 14:17:59
VFX Breakdown The Man Who Fell To Earth
On 2022-07-15 13:14:36
Resident Evil - Teaser Trailer
On 2022-05-13 13:52:25
New cloud modeling nodes for Bifrost
On 2022-05-02 20:24:13
MPC Showreel 2022
On 2022-04-13 16:02:13