Beer glass scene creation
This course contains a little bit of everything with modeling, UVing, texturing and dynamics in Maya, as well as compositing multilayered EXR's in Photoshop.
#
1
12-05-2006
, 08:32 PM

Moderator
Join Date: Jan 2004
Join Date: Jan 2004
Location: Michigan, USA
Posts: 2,998
need some rigging help
But I have never rigged. I enjoy modeling more the texturing, rigging, and animating. But everyone keeps asking me why all my models look so stiff and lifeless. I explain they are in the bind position for rigging. Then the next question is ... cool when can I see one posed?
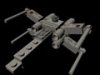
I just completed my model. It is based on the image planes from a tutorial on another site. I did not use the tutorial just the image planes. I just wanted to get a model that had really accurate image planes and was simple and fast to build.
But now I am stuck when it comes to rigging and skinning the model. I have never done it before and all the reference material I have is on rigging and skinning an organic character so I really don't know where to begin.
I see Kurt has a mech modelling tutorial but I can't find anything on rigging one.
Any suggestions?
Here is a quick render of the model with default lights 640x480. I am sure many will recognize the model.
#
2
12-05-2006
, 09:46 PM

Registered User
Join Date: Feb 2006
Join Date: Feb 2006
Location: Australia
Posts: 297
First up, ya model looks pretty sweet

Now I'm definitely no expert on all aspects of rigging, buts I've had a crack at it once or twice. The 1st thing ya need to do is set in the skeletal joints. There is a good FREE tutorial showing how to do this right here - https://www.simplymaya.com/movie_page...html?tut_id=36
Also, I recommend another tutorial explaining the basics of Set Driven Keys (SDK), which you can download here - https://www.simplymaya.com/movie_page...html?tut_id=40
Once rigged, the model needs the skin binded. Animation Tool Bar – Skin – Bind Skin. Your 2 options are Smooth or Rigid. For a mech model I suggest the rigid bind as it would give a more realistic result (joints overlap or pass through each other, where as with the smooth bind the joints deform more like organic limbs).
I also save my model in 3 stages – ‘unrigged’, ‘rigged’ and ‘skinned’ just incase something goes horribly wrong – lol.
Best of luck mate – post ya results !
#
3
12-05-2006
, 11:33 PM
Moderator
Join Date: Jan 2004
Join Date: Jan 2004
Location: Michigan, USA
Posts: 2,998
I wish someone would post how they make those really cool looking global illumination renders.
I don't understand how to use mental ray. I paid like $199 dollars to buy the alias learning vid and I learned nothing! The guy talked for like 4 hour and it was like sitting through a quantum physics class. I learned all there is to know about light but nothing about how to use the features of mental ray.
Even when the guy did give an example it was like okay lets set this value slider that only goes to 1000 manually to 80billion, then turn all the lights off in the scene, oh except for this one which I will set to some arbitrary value....
and it went on and on. I forced myself to watch it like 5 times and it just seemed like he randomly picked values for the 15 thousand options in the mental ray render tab. There was no ryhme no reason no patterns to follow.
I turned on global illumination and jacked every knob and twiddled every slider and put ridiculous values that I just pulled out of my ass into all the boxes and the render looks no different then a plain "production render".
So this is about the best I can manage. default final gather settings with 3 lights and a point light for backfill.
The model is just under 10,000 polys but I did not really try hard to optimize it. There are tons of hidden faces I did not bother to clean up as I was in a hurry to get to the rigging and skinning point.
cheers,
Last edited by ctbram; 13-05-2006 at 01:40 AM.
#
4
12-05-2006
, 11:45 PM
Moderator
Join Date: Jan 2004
Join Date: Jan 2004
Location: Michigan, USA
Posts: 2,998
... it looked the same so I deleted it to save on server space
#
5
13-05-2006
, 01:10 AM
Registered User
Join Date: Feb 2006
Join Date: Feb 2006
Location: Australia
Posts: 297
makin a good mentalray is one tough cookie to crack...
if you are interested, i have uploaded a basic template setup for ya. simply open, import your model then try a render with mentalray set to production quality preset.
link for template scene - https://dhost.info/tiddles/mentalray_template.zip
also, the floor and back wall have just been shoved in there real quick - u should change everything to suit.
i've attached a quick shot of what the template scene looks like below. dont forget to post what you come up with....
#
6
13-05-2006
, 01:37 AM
Moderator
Join Date: Jan 2004
Join Date: Jan 2004
Location: Michigan, USA
Posts: 2,998
cool beans!
Although at some point I am going to have to start learning to rigg/bind/render. It just seems so tedious. Unwrappiong UV's has got to be the most boring job in the universe!
UPDATE
hmmm. I can't seem to get to the link. A web page opens but nothing shows up. I am better it is norton firewall blocking, or getright, or one of the new security patches from MS.
Last edited by ctbram; 13-05-2006 at 01:39 AM.
#
7
13-05-2006
, 02:01 AM
Registered User
Join Date: Feb 2006
Join Date: Feb 2006
Location: Australia
Posts: 297
i am happy to send you the template via email??
#
8
13-05-2006
, 02:29 AM
Moderator
Join Date: Jan 2004
Join Date: Jan 2004
Location: Michigan, USA
Posts: 2,998
OMG this is awesome!
Even highly compressed to save server space it looks better then any 1280x1024 non-compressed render I have EVER made!!! :bow:
Last edited by ctbram; 13-05-2006 at 03:11 AM.
#
9
13-05-2006
, 02:36 AM
Registered User
Join Date: Feb 2006
Join Date: Feb 2006
Location: Australia
Posts: 297

now if I could just figure out how to model as good as you....
#
10
13-05-2006
, 03:25 AM
Moderator
Join Date: Jan 2004
Join Date: Jan 2004
Location: Michigan, USA
Posts: 2,998
can anyone tell me how to fix this..
Every time I render I get the follwing:
editDisplayLayerMembers render_layer `ls -selection`;
// Result: 16 //
// Warning: (Mayatomr.Scene) : no render camera found, final scene will be incomplete and can't be rendered //
// Warning: (Mayatomr.Scene) : lowerJawShape: empty UV set map1 detected, ignored //
// Warning: (Mayatomr.Scene) : topHeadShape: empty UV set map1 detected, ignored //
// Warning: (Mayatomr.Scene) : topEyeShape: empty UV set map1 detected, ignored //
// Warning: (Mayatomr.Scene) : l_eyeShape: empty UV set map1 detected, ignored //
// Warning: (Mayatomr.Scene) : r_eyeShape: empty UV set map1 detected, ignored //
// Warning: (Mayatomr.Scene) : torsoShape: empty UV set map1 detected, ignored //
// Warning: (Mayatomr.Scene) : pCylinderShape6Shape: empty UV set map1 detected, ignored //
// Warning: (Mayatomr.Scene) : pCylinderShape5Shape: empty UV set map1 detected, ignored //
This is just a portion of the list. I get this message for every part in the model.
I have tried:
1. exporting to DXF and re importing (A real pain because it wipes all my poly creasing!)
2. poly clean
3. scene optimizing
4. cleaning all the history
5. I looked in the hypergraph and each node only has a shapenode and the default shader.
6. exporting and importing into a new project.
The error is burned into the .mb file. I searched the web and although there have been numerous posts asking to fix this exact problem no one has posted a fix.
The only suggestion was to create a new uv set for each part using automatic mapping. The problem is this model has a zillion pieces and you have to remap each and every piece! It would take forever and it does not solve the underlying problem.... How can you restore the default UV map (map1) for all the pieces in the model? But I for this I am only guessing. I am a modeler (and a hack at best). I know little to nothing about rendering and how the uv editor thingy works!
map1 in the default UV map and somehow I wiped it is there anyway to fix this?
Kurt B. -- rig and pose my model please!
#
11
13-05-2006
, 09:52 AM
Moderator
Join Date: Jan 2004
Join Date: Jan 2004
Location: Michigan, USA
Posts: 2,998
was feeling a little to symetric ...
#
12
13-05-2006
, 09:55 AM
Registered User
Join Date: Feb 2006
Join Date: Feb 2006
Location: Australia
Posts: 297
you have any luck with the rigging?
i can't wait to see this bad-boy in action lol.....
keep it up!
PS: i'd be happy to give it a go for ya.....?
Last edited by tiddles; 13-05-2006 at 09:57 AM.
#
13
13-05-2006
, 10:13 AM
Moderator
Join Date: Jan 2004
Join Date: Jan 2004
Location: Michigan, USA
Posts: 2,998
#
14
13-05-2006
, 03:47 PM
Registered User
Join Date: Feb 2005
Join Date: Feb 2005
Location: This Place
Posts: 220
What I can offer you is advice on how to rig it. While I've never done an actual mech per-se, I have rigged other mechanical objects. The biggest one here is that, especially because you appear to have individual parts for everything, you do NOT want to either smooth or rigid bind the mech. First off, for either one of those options, it will distort the mech. Not what I'd want, on a mech. Second, if your model is seperate parts for everything, binding each individual part would be a pain (especially skin weighting it). Unfortunately, the better method isn't too much better.
The best way to rig something like a robot with individual parts is to build a skeleton like normal (well, I don't think in this case you need that many . Then, instead of binding the parts to the skeleton by skinning it, simply parent the parts to the skeleton itself; for instance, an upper arm would be parented to the shoulder joint of the skeleton, a lower leg joint is parented to the knee joint of the skeleton, and so on. The easiest way to do this is to middle-mouse drag things around in the outliner (make sure you grab the right part, and it really helps if you have everything labelled before hand). You might want a couple of constraints - things like having the foot always point downwards, perhaps, but just that general setup would be good. Here's the nice part - you only have to do about half of a symmetrical model. once you have a left or fight half of a model put into a skeleton, you can grab the first joint that diverges from the centerline (say, the first leg joint after the hip), duplicate it, and then you should be able to mirror the joint (an actual command) and move it to its proper posistion (just remember that all joints in a skeleton effect everything down the heirarchy, like normal parenting). After that's done, you can simply animate the joints like for any other skeleton - give them IK solvers and you're pretty much ready to go (although locking a couple of axes to restrict them to the direction the joints can actually go may help).
And looking at your model, driven keys are probably going to do you almost no good here. Well, maybe if you wanted to have something respond every time he took a step (like loose armor plates flapping or something) but other than that there doesn't appear to be enough 'unrelated' parts to warrant it.
Kinda hopes that helps.
Your model is looking good, although unfortunately I have no idea what its from.
#
15
14-05-2006
, 12:28 AM
Moderator
Join Date: Jan 2004
Join Date: Jan 2004
Location: Michigan, USA
Posts: 2,998
Here are the questions:
Can you tell me a little about that mray template?
Did you get this from a book, wbt, or vbt?
I am wondering what the three mel scripts in the presets folder do?
(mentalrayFramebufferPreset_mr_custom.mel, mentalrayGlobalsPreset_mr_custom.mel, mentalrayOptionsPreset_mr_custom.mel)
Also, do you know why the default "lambert1" has a rock shader on it? I don't see anything in the scene that is ucing it and I am not sure I want to create all my default abjects as rocks (LOL).
and finally, do you know why every time I try to quit maya I get a box asking me if I want to save the file even if I have already just saved it? (This behavior seems to be associated wiht this mb file and any file I import it into).
Posting Rules Forum Rules
Similar Threads
Rigging error on a long-necked creature...
by Auilix in forum Animation replies 1 on 24-01-2013
Beginning Rigging, Questions
by Jacob in forum Maya Basics & Newbie Lounge replies 3 on 19-04-2009
regards to rigging
by brij999 in forum Maya Modeling replies 0 on 31-08-2007
Help with rigging tutorials please
by farbtopf in forum Maya Basics & Newbie Lounge replies 0 on 10-04-2006
rigging problem - can't mirror
by stylish_chemist in forum Maya Basics & Newbie Lounge replies 2 on 20-08-2005
Topics


Free Courses


Full Courses


VFX News
How computer animation was used 30 years ago to make a Roger Rabbit short
On 2022-07-18 14:30:13
Sneak peek at Houdini 19.5
On 2022-07-18 14:17:59
VFX Breakdown The Man Who Fell To Earth
On 2022-07-15 13:14:36
Resident Evil - Teaser Trailer
On 2022-05-13 13:52:25
New cloud modeling nodes for Bifrost
On 2022-05-02 20:24:13
MPC Showreel 2022
On 2022-04-13 16:02:13