This course will look in the fundamentals of modeling in Maya with an emphasis on creating good topology. It's aimed at people that have some modeling experience in Maya but are having trouble with
complex objects.
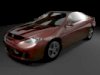
This is my newest project, using the excellent and venerable Tomcat Cartoon Shader. It's all polys, and the heat temper edge IS modeled (just couldn't get it to look right with maps)
the pic:
and the wire:
The beginnings of the character who weilds it:
C+C welcome as always! And sorry I haven't posted much lately, I have had LOT of schoolwork and just about no time.
Can we see a close up of the wire of the handle? I like the design and like to see it s little closer.
The clothing the guy is wearing seems a little thin, almost depthless. I like the blade but you might want to consider adding some detail to the hilt because the handle is so intricate, blade has lots of edge detail.. and the hilt looks like an oval.
________________________
AIM: SublimeDragon33
Catch me if i'm on. Always up for a chat.
e-mail: sublimedragon33@gmail.com
You will probably notice that it's not actually wrapped as a real katana is, It's just an illusion. But if this style is good enough for Kill Bill, it's good enough for me.
May i ask how you made it? You said its all polies, from the look ide guess you made a cylinder very short and pinched it on the side, then duplicated it down the handle.
Kill bill was a very.. unique movie. Sometimes the special effects where great and the scene very nice... then sometimes it was like starship troopers....
________________________
AIM: SublimeDragon33
Catch me if i'm on. Always up for a chat.
e-mail: sublimedragon33@gmail.com
Actually it was a torus, but that's basically what it did. I created it with a high radius and low section radius, and scaled it around and pinched the verteces together in the middle.
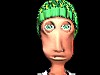
some more updates, this time on the female lead (the clothing is for the male guy). This head is based on a tutorial from Maya 4.5 savvy.
I've a bit of a problem, though: I made my head, duplicated it, made all my blendhapes, and then:
I realized that I had forgotten Eyebrows. Does anyone know how I could add these in without totally messing up all my blendshapes?
Maybe I could make them as a separate object parented to the head and deform them along with the blendshapes using set driven key, but I'm not sure how to do that or even if it would work.
Hey carrot, can you post a closeup wire of the tip of the blade as well as the heat tempered edge? I've gone through a couple methods of trying to model a katana and want to take a closer peek if that's ok.
If anyone has any comments that would stop her looking like a boy I would really appreciate it, none of my tweaks seem to do much.
Here you go:
In terms of poles and n-gons it totally breaks all the established rules, but I decided to experimentally try it out and see if I could stick that heat-temper in there without making my whole mesh hi-res. So far I have had no errors or glitches, and since its animation will not require it to bend around at all I don't anticipate any.
Really urgent though, if someone knows how to add geometry (eyebrows) to the face and all its blendshapes without making all the blends totally whack out I would REALLY appreciate it.
I'm having an idea that goes like this:
1. make the eyebrows and make blendshapes for the eyebrows, each brow blendshape corresponding to one of the head's blends.
2. Parent the eyebrows to the head
3. somehow make it so that when a head blendshape is used, the corresponding eyebrow blend is also used (set driven key, maybe?)
The problem is that I have no idea how to implement step 3. The docs don't seem to have anything on this type of situation.
You may not post new threads |
You may not post replies |
You may not post attachments |
You may not edit your posts |
BB code is On |
Smilies are On |
[IMG] code is On |
HTML code is Off