right, here are the final textures for the models:
1 512x512 colormap for the dragon. Added a scaley effect on the skin to break up the uniform green. Added a horn. All hand-drawn except for the mottled effect on the wing membrane.
https://www.flash-fx.net/images/3D/sa...l_textures.jpg
1 512x512 colormap for the samurai. All hand-drawn except the symbols on his jacket (front and back), the japanese writing on the sheath and the blade which was modified from a reference image.
https://www.flash-fx.net/images/3D/sa...l_textures.jpg
A wireframe of the final model pose including number of tris.
https://www.flash-fx.net/images/3D/sa...rame_final.jpg
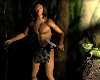
A smooth shaded version.
https://www.flash-fx.net/images/3D/sa...hade_final.jpg
and the final picture will be posted in the entries section soon!