revolver_cylinder_01.rar (38.3 KB, 244 views)
"If I have seen further it is by standing on the shoulders of giants." Sir Isaac Newton, 1675
#
5
12-02-2010
, 07:07 AM

Lifetime Member
Join Date: Feb 2004
Location: Chicago
Hi Ct ..for an experienced user booleans are pretty easy to control but for a new user it can be hell on earth if they dont know the pitfalls ..hehe

2 x Modeling Challenge Winner
#
6
12-02-2010
, 08:13 AM

Moderator
Join Date: May 2005
Location: Manchester Uk
Originally posted by jsprogg
Hi Ct ..for an experienced user booleans are pretty easy to control but for a new user it can be hell on earth if they dont know the pitfalls ..hehe
Very Very true. I would not recommend boolians to a new user. I would only intro them later on when they understand topology and when and where to use them.
"No pressure, no diamonds" Thomas Carlyle
#
7
12-02-2010
, 11:42 AM

The thin red line
Join Date: Aug 2009
Location: England
I think the sooner you understand how to clean the mesh after using a boolean the better, there is not anough tutorials out there to explain how to do this..............dave
#
8
12-02-2010
, 01:35 PM

Moderator
Join Date: Jan 2004
Location: Michigan, USA
yeah, I hear you P.
I started out doing only nurbs modeling. Back at maya 3 that was the primary way to model in maya. Machines back then could not handle the number of polygons that they can today and nurbs models were easier for systems and graphics cards to digest vs. lots of polygons.
Anyway, in the old nurbs method of modeling booleans and trims and fillets were used extensively and so I had an opportunity to learn all their quirks.
When I moved to polygon modeling I just naturally gravitated to using polygon booleans as I would use them in nurbs modeling. Polygon booleans have a whole new set of issues vs nurbs booleans that I had to figure out but I would say that in the end they were still worth learning to use.
I would really like to see better integration between nurbs and polygon modeling tools in maya. For instance it would be nice to project curves on poly surfaces, and take trimmed and filleted nurbs surfaces and convert them seamlessly to polygons.
Anyway, I hope the model and screen shots helped for the revolver cylinder and if anyone would like to see a camtasia video of the process just let me know and I will toss something together.
"If I have seen further it is by standing on the shoulders of giants." Sir Isaac Newton, 1675
#
9
12-02-2010
, 04:49 PM

Subscriber
Join Date: May 2004
Location: Bowling Green. Kentucky U.S.A.
would be nice to project curves onto poly surfaces.
But you can make an object live and draw curves on it, which can achieve similar results.
there is also a mel script on Creative crash that will allow you to create curve from edge on a poly model,
basically to will allow you to create two curves and do a fillet across two pieces of geometry that are crammed into each other for a seamless integration between to.
G-man
#
10
13-02-2010
, 07:38 PM
Registered User
Join Date: Feb 2010
can i see the camtasia video please ?
#
11
14-02-2010
, 01:48 AM
Moderator
Join Date: Jan 2004
Location: Michigan, USA
Okay I will post a link to a video tutorial on how to make the revolver cylinder using booleans.
I have the capture done I am just editing it and adding a sound track.
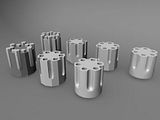
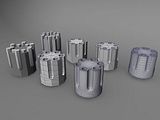
In this version I start with a 12-sided cylinder for the main cylinder and 6-sided cylinders for the holes and the indents. Why 12 and 6? Well I find a 6 sided polygon is about the smallest number of sides you can use to make a round cylinder when smoothed. Keeping the number of edges as low as possible will reduce the amount of cleanup we will need to do.
I chose 12-sided for the main cylinder because there are 6 holes and 6 indents so by choosing 12-sides I have either a hole or an indent at each of the cylinders 12 corners.
When smoothed everything will be nice and round.
Here is a screen shot of the new version and the original version...
Here is the .ma file with both versions...
I will have a link to the video tutorial shortly.
Cheers
|
revolver_cylinder_02.rar (80.6 KB, 249 views)
"If I have seen further it is by standing on the shoulders of giants." Sir Isaac Newton, 1675
#
12
14-02-2010
, 03:14 AM
Moderator
Join Date: Jan 2004
Location: Michigan, USA
Here is a link to a video I quickly tossed together on how to make the revolver cylinder using booleans as a guide, I hope you find it helpful.
Cheers,
ctbram
https://www.screencast.com/t/ZWExZDU2ZGQt
Notes:
1. It is best to delete history and freeze transforms before doing your boolean
2. Avoid short edges or small near zero surface area faces.
3. If your boolean gives unexpected results or your objects disappear completely check for:
a. flipped normals (turn off two sided lighting is a fast way to check for this)
b. make sure geometry is completely intersecting through at least one full polygon
c. clean history, freeze xforms
d. be sure geometry is manifold (no edges connecting more then exactly 2 polygons, no bow-tie geometry ie edges that intersect but have no vertex at the intersection, and finally no flipped normals)
4. Think about the geometry that will be created after the boolean and avoid creating near parallel edges that are right next to each other or faces with near zero surface area or edges with near zero length or vertices that are co-resident.
5. Remember you can use history after your boolean. To get the cutting pieces visible again so you can adjust them go to the hypergraph and find the hidden shape nodes and make them visible again (shift-h).
6. Don't go crazy with booleans, but also do not fear to use them! They can help you to get a start on a complex form and you can always just use the resulting shape as a template and build on top of it if it proves to hard to clean up.
Experiment with booleans to learn their quirks. Try to keep the shapes of the objects as simple as possible, ie if you are planning to smooth you don't need gazilian-sided objects (this is something you should think about all the time. Use as little geometry as possible to get the shape desired.)
Just a general note - Always think about edge flow. Try to keep the geometry simple and flowing smoothly around the model. don't be afraid to add edge loops to even out the polygon distribution, shore up corners and help smoothing interpolation.
Note on HOLES...
Sometimes when booleaning an object you will get holes in a surface. Maya considers any edges contained within a polygon face that have no connection to an OUTER edge as a "hole". A common error that can be quite frustrating is to attempt to fix the problem by cutting an edge from the hole to an outer edge on the polygon. Maya will print a nasty message and refuse to allow you to do this. The best solution is to just delete the entire face (like the end caps of this cylinder example) and then use bridge or append to polygon to systematically rebuild the entire face.
And one last thing...
Remember symmetry is your friend! Don't be afraid to destroy what seems to be most of your model and just work on the smallest symmetric part and then rebuild.
I hope some will find this little tutorial is helpful and it makes folks a little less intimidated by booleans. They can be quite a time saver if used for good and not for evil! (smile)
"If I have seen further it is by standing on the shoulders of giants." Sir Isaac Newton, 1675
Last edited by ctbram; 15-02-2010 at 02:59 AM.
#
13
14-02-2010
, 10:11 AM
|
revolver_cylinder_03.rar (202.2 KB, 233 views)
"If I have seen further it is by standing on the shoulders of giants." Sir Isaac Newton, 1675
Last edited by ctbram; 15-02-2010 at 03:34 AM.
#
14
14-02-2010
, 12:30 PM
Moderator
Join Date: Jan 2004
Location: Michigan, USA
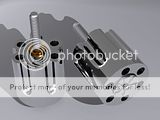
Tossed some mental ray shaders on things...
"If I have seen further it is by standing on the shoulders of giants." Sir Isaac Newton, 1675
Last edited by ctbram; 15-02-2010 at 03:31 AM.
#
15
14-02-2010
, 01:53 PM
The thin red line
Join Date: Aug 2009
Location: England
Another lovely little tutorial ctbram and what speed you model, wish I was half as fast............dave
You may not post new threads |
You may not post replies |
You may not post attachments |
You may not edit your posts |
BB code is On |
Smilies are On |
[IMG] code is On |
HTML code is Off
|