Integrating 3D models with photography
Interested in integrating your 3D work with the real world? This might help
# 1 10-08-2012 , 12:41 PM
TravisCowsill's Avatar
Registered User
Join Date: Oct 2011
Posts: 135

Horror Movie Set -with camera dolly

Hi forum,

A little back story here before I get to this project...

First, some of you may remember I had just started coming here as Maya jockey newb in-training when my apartment was burglarized and my computer, monitors and flash drive of all my work were stolen during my last Maya render in progress (never got to see the final renderuser added image. I bid the forum a sad and hopefully temporary farewell and appreciated everyone's support at the time.

Well, about 10 months later I'm back. I was able to have all my gear replaced a few weeks ago and basically picked up where I left off with my Maya training when I was robbed.

To that, I'm re-learning what I forgot over the last several months and foraging ahead with a few set builds related to my website I'm working to bring back about this time next year.

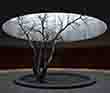
So here's what I'm working on presently. Obviously I have a long way to go, but I'm overall pretty pleased with the progress from one of two 2d reference images (one being the enclosed screenshot from the film, and the other -not posted-being an on-location, flash-lit front angle on the same space by a group of urban explorers who snuck into the location). Just started swapping out the placeholder poly's with the final core nerb models and am fine tuning the geography/scale and a matching up the lighting placements as best I can at least preliminarily to get a good bead on the mood to work in. Obviously, we're looking at mostly the basic poly's sans modeling at this point (except the tool box-it's pretty much finished save the handle).

I have one more basic area/spot light to set up to cast the two main shadows on the tool box and large boiler and one last as yet to be determined light source to even out the horizontal boiler surface on either side of the "stripe". Not overly concerned with the exact final placement and level adjustments on the lights at this stage, hotspots, levels, etc., as this is all temp. But you get the basic idea. Just fleshing things out and attempting to figure out where Jaques Hatekin (DOP) actually lit this set with and where he hid those lights to get these shadows and levels.

Oh, the figure model- Not my build, obviously a girl, and tilted to at least approximate the angle for scale and reference only. There won't be a figure in the final render. Also, I'm building the entire set to include the out of widescreen view field as I'll be doing a boom up in camera. So the letter-boxing is not present here.

Onward and upward and thanks again everyone. Tough haul getting back.

TC

PS- Anyone know how to get the image to appear in the image box here on the forums next to the thread title? Thanx!

Attached Thumbnails

Last edited by TravisCowsill; 20-08-2012 at 12:09 AM.
# 2 11-08-2012 , 06:35 AM
PixalZA's Avatar
Lifetime Member
Join Date: May 2011
Location: Riyadh, Saudi Arabia
Posts: 525


Earth: The crazy asylum of the universe.
# 3 11-08-2012 , 10:13 AM
tweetytunes's Avatar
Subscriber
Join Date: Jan 2004
Location: Bolton - UK
Posts: 2,457
No you don`t .

You just need to upload an image to the 1st part of your thread instead of linking to one - job done. It can be any format that the site uses. I just use jpegs.

Very good work so far are you going for the water on the ground aswell. This project is good to see as I have often said this would made a great challenge idea.


Last edited by tweetytunes; 11-08-2012 at 10:40 AM.
# 4 11-08-2012 , 04:46 PM
TravisCowsill's Avatar
Registered User
Join Date: Oct 2011
Posts: 135
Hi guys!

Thanks for the assist on the image icon for the thread. Worked like a charm. And for the supportive comments on the piece.

As for the water on the floor. Man, it's funny that that was what you brought up. Last night I was spending about three hours online checking out various fluid tutorials for that. Yes. I am really (gonna kill myself by saying this out loud) going for total authenticity of the shot. I have a good majority of the physical location's object-population in that fully lit conditions shot for the details I'll need that aren't quite visible here in the darkness, so that's great.

The water, I think I have a solid (no ironic humor intended) idea on how to do the effect using a water shader, but to shape it into the organic pattern you see here, that's what i'm currently researching.

My modeling skill-set is about low-intermediate, but as long as I have a good tutorial, I can pick things up very quickly and embellish on the details and run with it. That's (such a water floor spill shaping tutorial, lol) something I haven't found yet. But I'm sure I can cannibalize something out there. It'll just take some time to figure out.

Also going to attempt to do the flickering light business.

And That set is the easy oneof the 5 environments I'm buildinguser added image. I'm also going to attempt to do the opening "Nightmare" sequence (my start of that environment posted below-lights are nowhere nearly as "worked-on" as my current scene above), as Tina runs into the alcove before he pops up behind her. Moving camera (though no Tina inclusion in the scene), steam blast from the wall release, the whole 9 yards. That's actually the scene I started with, but have less fully it reference for on the side pipes and gears, and there's like a hundred of them attached to the pylons as she runs.

So, um yeah, I decided the "easier" shot above would be the first to attempt, haha. I'm looking at a long project deadline fer sure.

Nice to be back everyone. Looking forward to checking out all the new work here today.

TC

Attached Thumbnails

Last edited by TravisCowsill; 11-08-2012 at 05:31 PM.
# 5 13-08-2012 , 12:59 AM
Gen's Avatar
Super Moderator
Join Date: Dec 2006
Location: South FL
Posts: 3,522
Welcome back Travis user added image

About the water on the floor thing. You could approach it like this:

Model the floor so it had dips and uneven spots then set the water geometry below but intersecting to a point that gives you the desired water level. I like using a poly cube since it allows me to tweak the shader to create depth and even a volume shader if I wanted.

Attached Thumbnails

- Genny
__________________
::|| My CG Blog ||::
::|| My Maya FAQ ||::
# 6 13-08-2012 , 01:35 AM
Registered User
Join Date: Jun 2008
Location: Los Angeles, CA
Posts: 229
And if you really wanted to go crazy, you could use a fluid container instead of a geoCube. That'd allow you to get 'properly' simulated ripples. I'd start with a cube as well though, and only towards the end decide if I REALLY need to simulate. But using the dipped-modeled floor as a fluid colider, though sometimes tricky to get perfect, can get some pretty neat results. I did a little lava simulation a while back user added image


--
Peter Srinivasan
Producer
# 7 13-08-2012 , 07:18 AM
honestdom's Avatar
The Nurb Herd
Join Date: Oct 2007
Location: London
Posts: 2,381
Hey, welcome back.

This project looks fun. I'd suggest posting some screenshots with measurements. The camera focal length and film back should match the real camera and using some assumed measurements the set can be worked out around those. What scene scale are you using and how tall is your figure?
As for the water, there is probably no reason to do a fluid sim. Just use geo or a texture there are no ripples and it's a still image. I'd worry about more important things first... Modelling the set.

# 8 13-08-2012 , 12:00 PM
TravisCowsill's Avatar
Registered User
Join Date: Oct 2011
Posts: 135
Thanks so much everyone for the feedback and assist! Means allot to me.

I'm off to work at the moment but will be updating this thread tonight at some point.

I'll address the points broached then and post some more progress for input. Just getting into the swing here. I may post a video. We'll see. So great to be back!

# 9 19-08-2012 , 11:39 PM
TravisCowsill's Avatar
Registered User
Join Date: Oct 2011
Posts: 135
Hi Guys!

Well, a few days later than I would have liked for an update but I spent the rest of the week learning more about the program we love to love.

Namely, all about the fact that I need to to research my camera functions more before building my sets. I had no idea I had an actual 35 mm lens capability. Thanks to the previous posters for the head's up on changing the filmback/gate. Made all the difference.

Needless to say, I had to rebuild the entire set to accommodate once I enabled it. Great learning lesson and challenge as always with our dark mistress Maya. So here we go, this is the first time I put the reference image and my image side by side. I had planned on having to do some minor tweaking to match up, but was humbly surprised at how close I got it by eyeballing.

I'll go through one more weekend of fine tuning and geography adjustment on a few places, (bringing the black fg object and left boiler over a bit, tweaking the size of the wood slats, and the camera angle needs a bit of a nudge, etc.) but all in all, it's not going to be too bad a job. I think for a newb, I nailed it pretty darn close for a first recreation. Hope you guys agree. As always, any input is appreciated. Ill begin the modeling next weekend (started on my new props stage last night)and update as possible when I have more to show. Just so great being back with the community.

Thanks for looking. The video of the camera move this scene (yep did my first camera move attempt for the effect I'm trying) is uploading to youtube now and I'll post it here in a couple of hours. I will have a question on that (key frame issue at the end) if someone wouldn't mind the request from the experts.

See ya in a bit...here's the images.

1 Screenshot from film
2 obviously my grey scale in progressuser added image
3 Link to My very first camera test (I'm aware the lighting is far from doneuser added image

Youtube Link here...

https://youtu.be/ToLctlqX2CE

Attached Thumbnails

Last edited by TravisCowsill; 20-08-2012 at 12:07 AM.
# 10 21-08-2012 , 11:03 AM
bullet1968's Avatar
Lifetime Member
Join Date: Feb 2010
Location: Australia
Posts: 4,255
Looks good Trav...welcome back. There are some pieces missing but a good job none the less. I like Gens idea for the water but you could also create a displacement map in PS in seconds and apply it. It would give a more haphazard look to the waters edge. Good work mate

cheers bullet


bullet1968

"A Darkness at Sethanon", a book I aspire to model some of the charcters and scenes
# 11 21-08-2012 , 01:32 PM
honestdom's Avatar
The Nurb Herd
Join Date: Oct 2007
Location: London
Posts: 2,381
hey nice so far.
i looked at the camera move. not sure i get it. its pretty horrible tbh. is that what it does in the film? surely its just a drift or something.
one thing the camera move was good for was seeing the proportions of things in your scene. I imagine the using the right camera helped loads! user added image it looks good now.
What focal length did you end up with? i assume you are using 35mm academy filmback.

# 12 21-08-2012 , 04:57 PM
TravisCowsill's Avatar
Registered User
Join Date: Oct 2011
Posts: 135
Thanks Guys for the replies!

Let me try and answer a couple of points.

I'll start with my horrible camera move. Admittedly, unless you understand the context with why I'm doing it at all, why I'm focusing on the particular area(s) of interest in that confined space and landing on the second boiler, it won't make sense at all and unfortunately, it's a massive part of the project I'm working on for the next year, so I can't be very specific as to what's going on right now.

I will hint though to offer a bit more info since you asked Dom...No, it doesn't do that in the movie. It's a completely held shot. The experience/point I'm trying to convey here with this camera move is not to show off the environment. The original shot is one of the classic and most widely recognized from the film. But that's it. Held. So the first opening held frames are simply the homage, before the camera moves thought the space (with a purposeful destination being the boiler), so we see a few glimpses of those areas never seen before.

The entire scene in the film revolves around the fact that Robert makes his first appearance in that small space. Hence I'm keeping that as the main focal point of the dolly in and crane over. Staying in "his"space.

The end settle and slight drift back on the boiler...All I can say is that something (a few things) will be materializing free floating above the boiler's surface as the camera pulls back off of it .

This is only one cam move of two that will eventually navigate two key areas of the entire boiler room, adjoining two key locations from the film that were never meant to be connected. Once I have the other areas of the environment built and attached (the area is 150 feet by 90 feet), I'll do other camera moves (fly through dolly's) then through that larger space from this boiler, showing off some familiar aspects/areas of the conjoined sets along the way which were never linked A to B in the film, ending, again with the result segueing into a second very familiar area of the boiler room.

But not until the items materialize above the boiler. That action will help to establish why we're going to be moving into the second camera move.

I know. Cryptic. But it's between the lines.

So really, the first dolly and crane over here (in my Youtube link) is a test of a simple move to simply sweep through a familiar movie set, through a few previously un-seen angles behind to get to that second boiler surface.

I was just really proud of the timing and slow in's/out's of the camera movement having never used the camera function until this project. Not that it was like a magnificent swooping arcing camera that shows off my stage. That's not the purpose (though at some point I think that would be fun.) this entire endeavor is project based. hope that clarifies things a bit.

As to the lens work, YES, made all the difference in the world. THANK YOU! I'm at my day job so don't have the exact stats, but basically I left it at very close to the default settings under the stock 35 mm film back setting and it seemed to work great.

NOW...

Bear in mind alllll that and now the following. I eyeballed that template geography for this scene/stage. I mentioned in my last post that obviously between the ref image and my build, things were a bit off and needed some fine tuning. Well, I discovered the magical amazing fact last night that i could import the reference image and attach it directly to my hero cam as an underlay for final tweaking.

Now I can line everything up properly and it gave me the last bit of help with the correct scale and proportions...if not another three evenings of work on top of the modelling I have under way on my props stage.

See you guys then and thanks again for all the comments and support!

TC


Last edited by TravisCowsill; 21-08-2012 at 05:08 PM.
# 13 27-08-2012 , 03:46 PM
TravisCowsill's Avatar
Registered User
Join Date: Oct 2011
Posts: 135
Hey forum.

Quick post of the wip toolbox model from the set.

See above screen shot in my original post, this thread, for reference...

About 50 percent there at this point with the basic modeling (taking into account I'm also constructing the innards and roller drawer mechanism). Swapping out the side drawer panels for more accurate versions from better reference so don't pay much attention to them at this stage. They're just my first attempt at some fine modelling and the edges are too fine-seamed.

Front drawer panel (and entire drawer really) is supposed to be ajar slightly and off-kilter by about 4 degrees.

Mia material X shader with levels adjusted to what would be factory level pristine paint settings before I weather it down. No bumps or textures.Basic, but it's a start.

First three are guass renders. Last two are Mitchell at max sample rate.

Having an issue with a couple of verts that are more or less manageable (IE. are fine in that the surface effect they create at certain angles under the lights could very well be something that would appear on a real life toolbox such as this, but if I have the option I'd like to try and adjust and may need advice at some point if I decide it's bugging me too much as it will be something I'll probably face down the road on models where it's not going to look right. I may ask for help on If I have problems and maybe someone could jump in when/if that occurs. It's really minor. We'll see.

Be kind. this is the first completed model I've ever made start to finish, so I'm learning obviously as I go.

See you guys soon...

Attached Thumbnails

Last edited by TravisCowsill; 27-08-2012 at 04:04 PM.
# 14 29-08-2012 , 04:02 PM
TravisCowsill's Avatar
Registered User
Join Date: Oct 2011
Posts: 135
Drawer progressuser added image

Attached Thumbnails
# 15 29-08-2012 , 04:06 PM
TravisCowsill's Avatar
Registered User
Join Date: Oct 2011
Posts: 135
Last few Mitchell renders...

Attached Thumbnails
Posting Rules Forum Rules
You may not post new threads | You may not post replies | You may not post attachments | You may not edit your posts | BB code is On | Smilies are On | [IMG] code is On | HTML code is Off

Similar Threads