Introduction to Maya - Modeling Fundamentals Vol 2
This course will look in the fundamentals of modeling in Maya with an emphasis on creating good topology. It's aimed at people that have some modeling experience in Maya but are having trouble with
complex objects.
#
46
03-01-2009
, 12:55 PM
Subscriber
Join Date: Nov 2002
Join Date: Nov 2002
Location: Made in Spain
Posts: 422
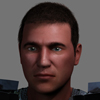
I did find the problem as to why the reflections were not showing up. I also added a wet layer and fine tuned the inner corner of the eye. I am pretty happy with how its looking. That whole rendering at 1024 reslution took 4 minutes. Now I need to do the eye lashes, and then off to hair.
I'll update this image once I finish with the eyelashes.
#
47
04-01-2009
, 02:46 AM

Lead Modeler - Framestore
Join Date: Feb 2003
Join Date: Feb 2003
Location: UK
Posts: 6,287
Jay
#
48
06-01-2009
, 07:51 AM
Subscriber
Join Date: Nov 2002
Join Date: Nov 2002
Location: Made in Spain
Posts: 422
Last edited by Minstrel; 06-01-2009 at 09:36 AM.
#
49
16-01-2009
, 01:32 PM
Subscriber
Join Date: Nov 2002
Join Date: Nov 2002
Location: Made in Spain
Posts: 422
I am using an old version of PS so I am wondering whether the load selection feature is what is sucking here and a new version of PS does a better job, or whether I should go look for after effects or some other compositing tool. If you know of any that has a trial version please let me know.
Any advice would be greatly appreciated.
Thanks!
#
50
04-02-2009
, 02:49 AM
Subscriber
Join Date: Nov 2002
Join Date: Nov 2002
Location: Made in Spain
Posts: 422
#
51
04-02-2009
, 04:47 AM

Registered User
Join Date: Oct 2007
Join Date: Oct 2007
Location: IL
Posts: 738
Just one thing I noticed is that he is almost perfectly shaved...
I don't think there were good enough razor blades back then
 .
.Definitely my favorite project in a long time
Keep it up,
Benny
When in doubt, delete history and freeze transformations.
My latest snake game
(Requires DirectX9 SDK and Framework)
#
52
04-02-2009
, 12:17 PM

Subscriber
Join Date: Jan 2004
Join Date: Jan 2004
Location: Bolton - UK
Posts: 2,457

#
53
04-02-2009
, 03:27 PM
Subscriber
Join Date: Nov 2002
Join Date: Nov 2002
Location: Made in Spain
Posts: 422
The mental ray set up is like this. Select the Fur setting from the presets, and then instead of resterizer click on scanline. Also, change the number of reflections/refractions to something greater than 1, because if you have transparent objects they may not render correctly. With resterizer as the main renderer I was getting nice hair, but the textures on the face were coming up weird. When I left all the settings as per the preset but change the rendered to scanline I still got nice hair, not as fast, but the textures and everthing else rendered the way I wanted. Also, I did not use raytracing on any lights (even though I still had raytracing as my secondary rendered). All the lights had dmap shadows on, and only 3 of them had fur attributes activated (shadow maps selected). Also, very important is that in the mental ray section you have details shadow maps turned on and click on the "take from..." botton. The shadow map I used was 2048 and the bias was 0.003. I used 20 samples.
Use fur maps for base width and base opacity to make sure the areas on the edges of the hair close to the camera are soft but the rest is still thick to create volume. You must use a baldness map, and use noise on the polar section under details to make the hair look natural. I used something like 0.14. Also, I decided for creating a scalp surface rather than doing it on the head surface. The scalp is missing a big part of the skull, the part you can't see on the image and it was hidden at render time. I created all the maps using artisan "edit fur attributes", and the baldness map using the 3D texturing feature.
Crazy thing is that once you figure out how to set this up you can crank up a decent looking hair very fast.
As to the laser shave this guy has...you are correct. there is some hair detail from the texture, but you can't really see it with this resolution. Lets see if I have the energy.
I want to spend more time on the armor again. The reflections seem to be too bright. Also, I need to do something with the under shirt beneath the chain mail on the neck.
#
54
14-02-2009
, 05:38 AM

Subscriber
Join Date: Oct 2006
Join Date: Oct 2006
Location: Boston
Posts: 566
Posting Rules Forum Rules
Similar Threads
Eyes will not stick with head when head is moved??
by mayaday in forum Maya Basics & Newbie Lounge replies 2 on 21-05-2011
making blendshapes for a head - help please copying the head is causing me problems
by dr9 in forum Maya Basics & Newbie Lounge replies 6 on 12-12-2006
another head
by littlelostalien in forum Work In Progress replies 2 on 15-11-2005
Project number 2: maya human head model
by ctbram in forum Work In Progress replies 32 on 02-04-2004
Topics


Free Courses


Full Courses


VFX News
How computer animation was used 30 years ago to make a Roger Rabbit short
On 2022-07-18 14:30:13
Sneak peek at Houdini 19.5
On 2022-07-18 14:17:59
VFX Breakdown The Man Who Fell To Earth
On 2022-07-15 13:14:36
Resident Evil - Teaser Trailer
On 2022-05-13 13:52:25
New cloud modeling nodes for Bifrost
On 2022-05-02 20:24:13
MPC Showreel 2022
On 2022-04-13 16:02:13