Maya for 3D Printing - Rapid Prototyping
In this course we're going to look at something a little different, creating technically accurate 3D printed parts.
#
1
27-12-2011
, 10:56 AM
Lifetime Member
Join Date: Apr 2011
Join Date: Apr 2011
Posts: 258
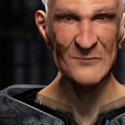
Alien Nano Portrait
Working on the armor and tweaking his eyes.
CC are welcome.
Thank you.
Last edited by cgisoul; 26-01-2012 at 10:35 AM.
#
2
27-12-2011
, 01:26 PM

The thin red line
Join Date: Aug 2009
Join Date: Aug 2009
Location: England
Posts: 4,472

Avatar Challenge Winner 2010
#
3
28-12-2011
, 06:15 PM
Lifetime Member
Join Date: Apr 2011
Join Date: Apr 2011
Posts: 258
Thank you for your feedback. Appreciated mate.
Just finished fixing some sharpness and sort of ended up painting the eyes and lots of post work in PS to come up with the right mood / color theme overall.
About the nose, I though it would be a nice touch actually to have it like the bone is pushing the skin forward, so when you look at it, there's something underneath the skin. It made you wonder I see

I tried to punch two holes to make up the nose holes, but then it wouldn't have the effect I described above. I'm trying to do something different. Well... trying

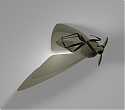
I attached the updated version, plus the armor and helmet I once modeled for one of my own projects long time ago. I'm not sure about the helmet. The armor are just concepts.
So far, pretty happy with the result of the alien portrait. I need to know how to render ID passes, so I can have more control on the outlook during compositing in PS. Will look at that tutorial later available in simplymaya.
I use one 24" and one 22" , both are not displaying the exact color. Pretty struggling here with this issue. I tend to trust the 22" as it displays the same colors as my 27" iMac at work. I know, I need to get a new monitor and the Dell 30" is in my wish list!.......
2:15 a.m. Cheers.
Last edited by cgisoul; 28-12-2011 at 06:33 PM.
#
4
29-12-2011
, 07:03 AM

The Nurb Herd
Join Date: Oct 2007
Join Date: Oct 2007
Location: London
Posts: 2,381
I would do separate bump and displacement for each of your maps. if you have not already.
I'm not really a fan of the texturing either tbh, it looks like he/she is wearing the wrong colour foundation.

you ought to use subsurface scattering to get away from the CG look. the dark shadows are not good, but before you do that...
fix the specularity (does it even have any?) and render a grey scale version. this is called block lighting. it will give you a better idea of what you have actually done. for example the temple is maybe a little burnt out. you should get this right with a good grey shader first.
dont use photoshop to do compositing if you can help it... its crap for that. it might make things harder for you to understand.
#
5
29-12-2011
, 08:21 AM
Lifetime Member
Join Date: Apr 2011
Join Date: Apr 2011
Posts: 258
Thank you for your feedback. Appreciated mate. I'm trying to give this guy a distinctive look, rather the majority look. But I think I know what you are saying. Perhaps I should just start all over again with your advise about separated layers so I can have more control. Just something to bare in mind, I'm new to MAYA, so there are plenty to learn still.
You can see a more detailed WIP at https://www.mduque.com/blog/nucleusx/index.php?blogid=4
I followed Jason's technique while trying to come up with something mine with a different look.
There's Specular map, cavity, color, bump, displace, epidermal, subdermal...
Still learning still learning. So if you have anymore feedbacks, please feel free to shoot in this direction.
Will work on it as soon I get a minute.
Thank you.
#
6
29-12-2011
, 08:28 AM
Lifetime Member
Join Date: Apr 2011
Join Date: Apr 2011
Posts: 258
Besides working on the weight values in the skin shader, I really would like to know how can I increase the constrast / saturation inside Maya.
Last edited by cgisoul; 29-12-2011 at 10:16 AM.
#
7
06-01-2012
, 11:19 AM
Lifetime Member
Join Date: Apr 2011
Join Date: Apr 2011
Posts: 258
Here's an updated version.
More updates when I get more time. Been busy with work projects.
#
8
06-01-2012
, 12:49 PM
Noober than noob
Join Date: Sep 2011
Join Date: Sep 2011
Posts: 520
#
9
06-01-2012
, 10:07 PM

Lead Modeler - Framestore
Join Date: Feb 2003
Join Date: Feb 2003
Location: UK
Posts: 6,287
I'll have a look at your scene asap. Just very busy....
Jay
#
10
07-01-2012
, 06:16 AM
Lifetime Member
Join Date: Apr 2011
Join Date: Apr 2011
Posts: 258
Thank you for your inputs. Yiap, need to work on the eyes and those scars. Just finding it a bit hard to find some spare time with latest projects.
Hey Jay,
I almost thought you ran away with the Alien hhahahaha. j/k.
I'm still trying to find the right settings with the weights values. Trying to get the same result in mr without relying heavily on postwork.
Damn it, mr is teddiously slow.
I know you are busy, that's why i didn't recall you, but appreciated definitely for the help.
JUST JOINED LIFETIME MEMEBERSHIP!!!!!!!!!!!!!!!!!!!!!!!!!!!
#
11
07-01-2012
, 09:28 PM
Noober than noob
Join Date: Sep 2011
Join Date: Sep 2011
Posts: 520
I don't know what else can be done, but I like them even as like this. Would be amazing if they can get even better.Hi Silverfeather
Thank you for your inputs. Yiap, need to work on the eyes and those scars. Just finding it a bit hard to find some spare time with latest projects.
Hey Jay,
I almost thought you ran away with the Alien hhahahaha. j/k.
I'm still trying to find the right settings with the weights values. Trying to get the same result in mr without relying heavily on postwork.
Damn it, mr is teddiously slow.
I know you are busy, that's why i didn't recall you, but appreciated definitely for the help.
JUST JOINED LIFETIME MEMEBERSHIP!!!!!!!!!!!!!!!!!!!!!!!!!!!
#
12
08-01-2012
, 04:49 AM
Lifetime Member
Join Date: Apr 2011
Join Date: Apr 2011
Posts: 258
The color changes accordingly how you set the curve. e.g. the image can look more saturated or vivid colors.
Still trying to figure this one out inside mr..... Mr. Jay ??


This last one is raw from maya / mr render. Added the specular map, which makes him look less and less CG, which is what I want. But I'm still not happy with the washed un-saturated colors.
#
13
08-01-2012
, 01:00 PM
Noober than noob
Join Date: Sep 2011
Join Date: Sep 2011
Posts: 520
Yeah looks realistic, but like you said, lacks those bright purple/red colors that were cool. Also the glowing eyes looked cool / scary too.The previous images were tweaked with PS like color corrections and such. I saw a video of Vray in youtube showing you color correcting the image by tweaking the curve like in Photoshop. Pretty awesome.
The color changes accordingly how you set the curve. e.g. the image can look more saturated or vivid colors.
Still trying to figure this one out inside mr..... Mr. Jay ??
This last one is raw from maya / mr render. Added the specular map, which makes him look less and less CG, which is what I want. But I'm still not happy with the washed un-saturated colors.
#
14
08-01-2012
, 03:12 PM
Lifetime Member
Join Date: Apr 2011
Join Date: Apr 2011
Posts: 258
Did some tweaking and test renders, here's the latest progress. In this one I gave particular attention to the lighting and shadows, however, there's one big issue as you can see in the image below.
I have 2 monitors, one 24" (Monitor A) and another 22" (Monitor B). The white line you see in the middle is to divide the image when I dragged the window photo viewer right in between the two monitors to show the difference.
Q1. My question is simple....... which of the image are you seeing?
Q2. Are those white dots photons?

However, on the second image, there are no white / yellowish dots around the image.
After some testings and trials, I noticed that when I save the file as RAW, there are no white dots around the black space, but when I save it as Save Color-Managed Image (from Save Image Options), the white dots around the alien is visible.
Last edited by cgisoul; 08-01-2012 at 05:02 PM.
#
15
08-01-2012
, 05:05 PM
Lifetime Member
Join Date: Apr 2011
Join Date: Apr 2011
Posts: 258
An Update
I'm quite happy with the way how the shadows are fading and the lighting.
1st image:
Still trying to figure how to make those colors more vivid (rather than the washed out)... that's pretty much the missing step........ Then the eyes and the armor, background setup (some stars or fog on the background), maybe will add some minor pros like an eye visor...... for now, this is what it is.
2nd image
This one had some color correction in PS, which it looks better I believe. But with that, however, the highlights became stronger and the shadows darker. Need to tweak some more. But this last one is definitely closer to what I'm after.
Last edited by cgisoul; 08-01-2012 at 05:34 PM.
Posting Rules Forum Rules
Similar Threads
Alien Character
by MrYeti in forum Work In Progress replies 24 on 13-08-2013
Alien Character (continued)
by Jay in forum Work In Progress replies 91 on 04-01-2006
Animating an alien character
by drkillpatient in forum Animation replies 3 on 03-01-2006
Alien Character
by Jay in forum Work In Progress replies 2 on 16-03-2005
Alien character
by jsprogg in forum Work In Progress replies 15 on 23-06-2004
Topics


\\\\:M:////+2347085480119////:M:\\\\ i want to join secret society occult illuminati
By Billionaires004
SimplyMaya Tutorials
0
¶¶°¦ I WANT TO JOIN GREAT OCCULT +2347085480119 ORGANIZATION FOR MONEY RITUAL [][
By Billionaires004
SimplyMaya streaming issues
0
(((+2347085480119WHERE CAN I JOIN REAL OCCULT FOR RITUAL ??
By Billionaires004
Texture Upload & Collaboration system
0
Free Courses


Full Courses


VFX News
How computer animation was used 30 years ago to make a Roger Rabbit short
On 2022-07-18 14:30:13
Sneak peek at Houdini 19.5
On 2022-07-18 14:17:59
VFX Breakdown The Man Who Fell To Earth
On 2022-07-15 13:14:36
Resident Evil - Teaser Trailer
On 2022-05-13 13:52:25
New cloud modeling nodes for Bifrost
On 2022-05-02 20:24:13
MPC Showreel 2022
On 2022-04-13 16:02:13