Introduction to Maya - Rendering in Arnold
This course will look at the fundamentals of rendering in Arnold. We'll go through the different light types available, cameras, shaders, Arnold's render settings and finally how to split an image into render passes (AOV's), before we then reassemble it i
#
1
31-07-2007
, 02:51 PM
Registered User
Join Date: Jan 2004
Join Date: Jan 2004
Location: Japan
Posts: 227
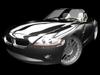
Nissan Skyline R34 Autobot
Because I didn`t have time to finish it, I just did a very crap texturing and posing just to present to the competition and if I`m lucky enough I will get the first price with is the PLAYSTATION 3!
And I hope I will be finishing the model here in this post.
#
2
31-07-2007
, 02:53 PM
Registered User
Join Date: Jan 2004
Join Date: Jan 2004
Location: Japan
Posts: 227
#
3
31-07-2007
, 02:56 PM
Registered User
Join Date: Jan 2004
Join Date: Jan 2004
Location: Japan
Posts: 227
I could have done all those image in more small scale but, I thought some people would like to see the detail.
#
4
31-07-2007
, 02:59 PM

Moderator
Join Date: May 2005
Join Date: May 2005
Location: Manchester Uk
Posts: 6,300
"No pressure, no diamonds" Thomas Carlyle
#
5
31-07-2007
, 03:01 PM
Registered User
Join Date: Jan 2004
Join Date: Jan 2004
Location: Japan
Posts: 227
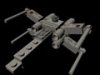
Well , all those interior parts is just temporary, I just made it to present for the competition.
But my intention is to make more belivable, like in the movie.
So basically I want to take all those interior out and replace it with the parts that actually real cars parts, like engine and such.
It is a long way to go, I know.....
#
6
31-07-2007
, 03:12 PM
Registered User
Join Date: Jan 2004
Join Date: Jan 2004
Location: Japan
Posts: 227
This texture is also teporary.
I know is a very bad looking texture...specular and all.
#
7
31-07-2007
, 03:15 PM
Registered User
Join Date: Jan 2004
Join Date: Jan 2004
Location: Japan
Posts: 227
Fast reply!
I problably will be doing some animation, but at the moment the model have some weird rigging problems, probably is the IK.
#
8
31-07-2007
, 03:53 PM
Registered User
Join Date: Jun 2007
Join Date: Jun 2007
Location: Türkiye
Posts: 53

man its really lookin awesome.
A car tranforming

i think its so complicated
waitin 4 more animated projects

#
9
31-07-2007
, 09:50 PM

Subscriber
Join Date: Aug 2004
Join Date: Aug 2004
Location: Florida
Posts: 93
CDV
#
11
31-07-2007
, 10:54 PM
Maniacal boy king of Babylon
Join Date: Aug 2005
Join Date: Aug 2005
Location: the netherlands
Posts: 1,605
Great work
#
12
01-08-2007
, 10:26 AM
Registered User
Join Date: Feb 2005
Join Date: Feb 2005
Location: This Place
Posts: 220
I might be able to help with the rigging problems - I'm good with machine one. I've built expanding joints, know how to make joints do full flips, among other things.
Regardless, I'd like a closer look at your model (I'll admit, I want a copy of the model itself). I'm trying to figure out how to make these kinds of things (So far all I have is beetles out of spheres - but its completely mechanically correct).
Book Wise
https://X4nd5r.deviantart.com
#
13
01-08-2007
, 11:58 AM
Registered User
Join Date: Jan 2004
Join Date: Jan 2004
Location: Japan
Posts: 227
I appreciate for all that excitement, but...
I think you guys are thinking that this model already have full animatic FK/IK system , and all those parts that transform are correctly done.
Well is not...
I would need to go back and remake all the rigging stuff, and the UVS at the moment are useless, and some interior parts doesn`t fit when`s in the car shape so I`m hiding it ( and those kind of stuff that I would like to replace and make it not hidden).
It is still a long way to go.
But so for those who ask me how I did that so far I will post some WIP pics, and information...that might help.
So let start.
first I started with the car, because obviously my intention here is to make something to transform into a car.
and after the car is done, I started to break the body into peaces.
(Before I start breaking I knew quite for sure with part go where when this model get tranformed, so wasn`t too difficult to figure`t out how I should break it, so my advice is to get to know how you going to break and make it transform)
Last edited by Stormgetto; 01-08-2007 at 12:04 PM.
#
14
01-08-2007
, 12:15 PM
Registered User
Join Date: Jan 2004
Join Date: Jan 2004
Location: Japan
Posts: 227
After I had all my car split into peaces, I did a quick search to see how the transformers are actually transformed....
*probably I could have done this research even before I split the car....
Anyway after I decide how should my car transform (this I mean how roughly my transform will be in@the robot shape) I started to put all those splited part in the position of the robot.
*remember to save in different file so you can use a old file (car model file) to use as reference when you going to make it transform back to a car.
And when I got satisfied with the position I started making the interior and the skeleton.
#
15
01-08-2007
, 12:17 PM
Registered User
Join Date: Jan 2004
Join Date: Jan 2004
Location: Japan
Posts: 227
Posting Rules Forum Rules
Similar Threads
Nissan Skyline R33 GTR
by Acid44 in forum Work In Progress replies 12 on 09-07-2009
Nissan Skyline R34
by Acid44 in forum Work In Progress replies 26 on 25-10-2008
Another Skyline R34
by mmmm_soup in forum Work In Progress replies 29 on 25-08-2008
Nissan Skyline r34
by ericmattison81 in forum Work In Progress replies 182 on 19-08-2008
Nissan Skyline
by aldudeau in forum Work In Progress replies 9 on 29-01-2004
Topics


Free Courses


Full Courses


VFX News
How computer animation was used 30 years ago to make a Roger Rabbit short
On 2022-07-18 14:30:13
Sneak peek at Houdini 19.5
On 2022-07-18 14:17:59
VFX Breakdown The Man Who Fell To Earth
On 2022-07-15 13:14:36
Resident Evil - Teaser Trailer
On 2022-05-13 13:52:25
New cloud modeling nodes for Bifrost
On 2022-05-02 20:24:13
MPC Showreel 2022
On 2022-04-13 16:02:13