 This pic has the front view and perspective together in the same pic of the model so far. Also, the body and head are not connected yet...but I will connect them once the body is completed.
Integrating 3D models with photography
Interested in integrating your 3D work with the real world? This might help
#
46
18-07-2004
, 02:10 AM
Registered User
Join Date: Oct 2003
Join Date: Oct 2003
Location: Maryland, USA
Posts: 172
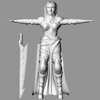
On to the body...
This pic has the front view and perspective together in the same pic of the model so far. Also, the body and head are not connected yet...but I will connect them once the body is completed.
~CGPMaya84 (also DragonTU84 from SimplyPhotoshop and CPAnimate84 from SimplyMax)
#
47
10-11-2004
, 02:47 PM
Registered User
Join Date: Oct 2003
Join Date: Oct 2003
Location: Maryland, USA
Posts: 172
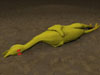
 I began some work on the legs using NURBS curves and lofting...but I will need to convert it to Polys to join the pieces together once all the lofting is complete...
~CGPMaya84 (also DragonTU84 from SimplyPhotoshop and CPAnimate84 from SimplyMax)
#
48
10-11-2004
, 04:27 PM
Registered User
Join Date: Oct 2003
Join Date: Oct 2003
Location: Maryland, USA
Posts: 172
I still need to do the hands and feet though...
~CGPMaya84 (also DragonTU84 from SimplyPhotoshop and CPAnimate84 from SimplyMax)
#
49
10-11-2004
, 04:40 PM
Registered User
Join Date: Oct 2003
Join Date: Oct 2003
Location: Maryland, USA
Posts: 172
~CGPMaya84 (also DragonTU84 from SimplyPhotoshop and CPAnimate84 from SimplyMax)
#
50
10-11-2004
, 10:35 PM

Registered User
Join Date: Mar 2003
Join Date: Mar 2003
Location: Central Florida
Posts: 102
The thing that jumps out at me is that there seems to be to many (can't think of the right term.. not uv's, not cv's...) grid lines going in a vertical direction on your torso. Since it is still a nurbs surface I would reduce it now to make it easier to work with when converted to polys. Hope that helps.
#
51
10-11-2004
, 11:18 PM

Registered User
Join Date: Aug 2004
Join Date: Aug 2004
Location: USA, CA
Posts: 351
#
52
10-11-2004
, 11:28 PM
Registered User
Join Date: Oct 2003
Join Date: Oct 2003
Location: Maryland, USA
Posts: 172
 ), but I can post a shot of the reference I was using for the head. :p
~CGPMaya84 (also DragonTU84 from SimplyPhotoshop and CPAnimate84 from SimplyMax)
Last edited by CGPMaya84; 10-11-2004 at 11:30 PM.
#
53
11-11-2004
, 02:05 AM
Registered User
Join Date: Oct 2003
Join Date: Oct 2003
Location: Maryland, USA
Posts: 172
~CGPMaya84 (also DragonTU84 from SimplyPhotoshop and CPAnimate84 from SimplyMax)
#
54
11-11-2004
, 12:34 PM
Registered User
Join Date: Mar 2003
Join Date: Mar 2003
Location: Central Florida
Posts: 102
https://www.mtmckinley.net/
Go to the tutorials section, then modeling.
Also there is a link to pre-order his new book!
I am sure it would be the perfect holiday gift!
#
55
13-11-2004
, 11:33 PM
Registered User
Join Date: Oct 2003
Join Date: Oct 2003
Location: Maryland, USA
Posts: 172
Ok, well I do have another update though (legs still need to be attached though): I created the shirt, started on the gloves (just need to do the fingers), started the upper-body armor, and even did some of the wraps around the legs. Next update will include more armor hopefully, and maybe even a go on the skirt and pants eventually. Also, the leg wraps will be attached to the pants once they are done. :p Here is the front view of the model:
~CGPMaya84 (also DragonTU84 from SimplyPhotoshop and CPAnimate84 from SimplyMax)
#
56
13-11-2004
, 11:35 PM
Registered User
Join Date: Oct 2003
Join Date: Oct 2003
Location: Maryland, USA
Posts: 172
~CGPMaya84 (also DragonTU84 from SimplyPhotoshop and CPAnimate84 from SimplyMax)
#
57
14-11-2004
, 12:54 AM

Subscriber
Join Date: Jul 2004
Join Date: Jul 2004
Location: England
Posts: 171
As for the process of Nurbs modelling, hats off to ya. its not an easy task. To start doing this effeciently have a look for some 'patch modelling' tutorials. Basically u cut ur model up into rectangluar patches (all nurbs shapes are four sided planes twisted and shaped) and stitch them together. Really worth a look.
Good luck with it all!
Kerosene
#
58
14-11-2004
, 04:44 AM

Moderator
Join Date: Nov 2002
Join Date: Nov 2002
Location: New York
Posts: 2,133
I think you're going to find it very frustrating when attaching all the pieces together in this model as you really want to create a seamless flow in the mesh. Typically you would rebuild your surfaces so that they match in the direction (u or V) you're stitching. If you ever check out one of Kurt's character modeling tutorials, he uses a nice method of starting with NURBS primitives, matching seams and spans, then converting to poly for detailing. It's a good method if you prefer roughing things out in NURBS. Then once you convert to poly, you can cut the model in half and use poly proxy mode to view the smooth model while tweaking the low poly. Then, you just make cuts/splits as you need them for higher detail. Character modeling entirely in NURBS is definitely a challenge...you've got your work cut out for you.
"Terminat Bora Diem, Terminal Auctor opus."
#
59
14-11-2004
, 12:41 PM
Registered User
Join Date: Oct 2003
Join Date: Oct 2003
Location: Maryland, USA
Posts: 172
I will take all that you both said into consideration! Kerosene: I see what you are saying about the arm. I guess I went a little overboard when doing the chest armor. I know the muscle structure you are referring to, although I do not know the name of it neither. :bored: So, don't worry about not knowing the name.
I will try and make the armor not get too close to the armpit...I really DO need to fix that! Also, thanks for the advice on the patch modeling tuts. I will need to take a look into it. I have never worked with patch modeling before, but I am always willing to try something new!NitroLiq: You are right, trying to attach all of those NURBS shapes can be a pain!
 I am going to try different techniques though and see which one works best. I was considering just converting the model to POLYS and then tweeking it from there, but I like to see how far I can go with NURBS. I am actually better at using NURBS though than I am with POLYS. I really don't have much experience with using POLYS, and I tend to work at a faster pace with NURBS. I tried doing a POLY head once...and it just didn't turn out that well at all... :o I really do not use any NURBS primitives for my models. Rather, I just create my own NURBS shapes by making tons of curves and then using such commands as lofting and such. I actually learned to primarily use NURBS when I took my Computer 3-D Modeling course, so that is probably why I am so familiar with it more so than POLYS, even though I am still learning how to use NURBS even to this day!
  I always wanted to learn how to model with POLYS someday...hopefully someday soon (once the semester is over) I can sit down with a nice poly tut and learn how to model in POLYS.
~CGPMaya84 (also DragonTU84 from SimplyPhotoshop and CPAnimate84 from SimplyMax)
#
60
14-11-2004
, 01:54 PM
Subscriber
Join Date: May 2004
Join Date: May 2004
Location: That place with all those people
Posts: 1,041
Watch Space Wars at www.3dden.co.uk now!
__________________________
My pin number is XXXX
Posting Rules Forum Rules
Similar Threads
Issues for max to maya users
by bertvaneeckhout in forum Maya Modeling replies 23 on 25-09-2014
Mental Ray crashing scene?
by JustMcCollum in forum Maya Technical Issues replies 7 on 10-05-2013
Maya Friendly Game Plug-in's!!!!!
by killamike718 in forum Maya Basics & Newbie Lounge replies 8 on 23-06-2006
MAYA TUTORIALS IN SPANISH (The monkey head)
by betito in forum Maya Basics & Newbie Lounge replies 6 on 18-06-2006
Problem with Maya 5
by PureFire in forum Maya Technical Issues replies 2 on 23-07-2003
Topics


Free Courses


Full Courses


VFX News
How computer animation was used 30 years ago to make a Roger Rabbit short
On 2022-07-18 14:30:13
Sneak peek at Houdini 19.5
On 2022-07-18 14:17:59
VFX Breakdown The Man Who Fell To Earth
On 2022-07-15 13:14:36
Resident Evil - Teaser Trailer
On 2022-05-13 13:52:25
New cloud modeling nodes for Bifrost
On 2022-05-02 20:24:13
MPC Showreel 2022
On 2022-04-13 16:02:13