Introduction to Maya - Modeling Fundamentals Vol 1
This course will look at the fundamentals of modeling in Maya with an emphasis on creating good topology. We'll look at what makes a good model in Maya and why objects are modeled in the way they are.
# 16 19-03-2014 , 10:46 PM
tweetytunes's Avatar
Subscriber
Join Date: Jan 2004
Location: Bolton - UK
Posts: 2,457

Looking good Tweety you might want to put a little spec on the paint and some dirt on the on some parts of the pistons..............dave

Hay Thx Dave.

I have said before both "Spec" and "Displacement/bump" maps are plained but I am not the best at painting maps and talking the time on learning how to make them so right now just doing the "Colour/defuse" map.
But looking at the ref - is the paint going to have any spec on it ? The JCB`s and CAT`s and the model from the film don`t seem to have much if any.

As for dirt on the pistons the ref baffles me. Every image I look at there never seems to be dirt on the pistons - thats why I have left it of. Check out the prev images of ref I have posted as well as the ones below and you`ll see what I mean.

Attached Thumbnails

# 17 20-03-2014 , 12:39 AM
daverave's Avatar
The thin red line
Join Date: Aug 2009
Location: England
Posts: 4,472
Hi Tweety
They do have a good bit of spec but as they are diggers they get a lot of dirt and dust that covers them. The best way to create spec maps is from the colour maps so long as you have kept them as separate layers in ps and use the desaturate and levels to get the correct balance, For most part you are correct about the piston they are kept clean were they interact but at the end they can get dirty..........dave


Avatar Challenge Winner 2010
# 18 20-03-2014 , 10:34 PM
tweetytunes's Avatar
Subscriber
Join Date: Jan 2004
Location: Bolton - UK
Posts: 2,457
Again cheers Dave - will take it all on board when I do the other maps - added some dirt to the pistons in the next image.

Went in and created new maps for the right leg - only done 4 out of the 6 so far but it helps a lot to kill the mirror effect right of the bat.

Tried to come up with an end result for this - not sure just to have the model rendered out as is or set up a new scene for it, time will time I guess.

user added image


# 19 21-03-2014 , 05:55 PM
tweetytunes's Avatar
Subscriber
Join Date: Jan 2004
Location: Bolton - UK
Posts: 2,457
Finally found some images of the model my uncel had which was far surpire to the one I had.

It is/was the idea in my head of what it should have looked like textured when I modeled the thing years ago. My model was no where near this detailed but did come with a busted up and ripped in half bishop hahahaha.

user added image

user added image


# 20 22-03-2014 , 11:39 PM
tweetytunes's Avatar
Subscriber
Join Date: Jan 2004
Location: Bolton - UK
Posts: 2,457
Right the texture painting for the defuse/colour of the legs - I am calling done. Other maps not done yet. Added the foot straps and starting the cables from the piston to the back next - Hoping I hit no problems here.

user added image


# 21 24-03-2014 , 02:34 PM
tweetytunes's Avatar
Subscriber
Join Date: Jan 2004
Location: Bolton - UK
Posts: 2,457
Well got the cables in but after looking at the renders I now think they are too thin, oh well.

user added image


# 22 25-03-2014 , 12:10 AM
daverave's Avatar
The thin red line
Join Date: Aug 2009
Location: England
Posts: 4,472
Hi Tweety
Hope you don't mind I thought I might have a go at a texture..............dave

Attached Thumbnails


Avatar Challenge Winner 2010
# 23 25-03-2014 , 03:20 PM
tweetytunes's Avatar
Subscriber
Join Date: Jan 2004
Location: Bolton - UK
Posts: 2,457

Hi Tweety
Hope you don't mind I thought I might have a go at a texture..............dave

Not at all mate - thank you. As I said this is a learn exercise for me.

But I just want to show you a few things here and would really like to see what your thoughts are on this.

Image ref:
1. Your file
2. Current render
3. Ref from model
4. Ref of whole leg from film.
5. Ref from film showing of scratches, heavy oil dirt in corner and paint colour/reflections/smoothness.
6. Part of my foot texture

user added image

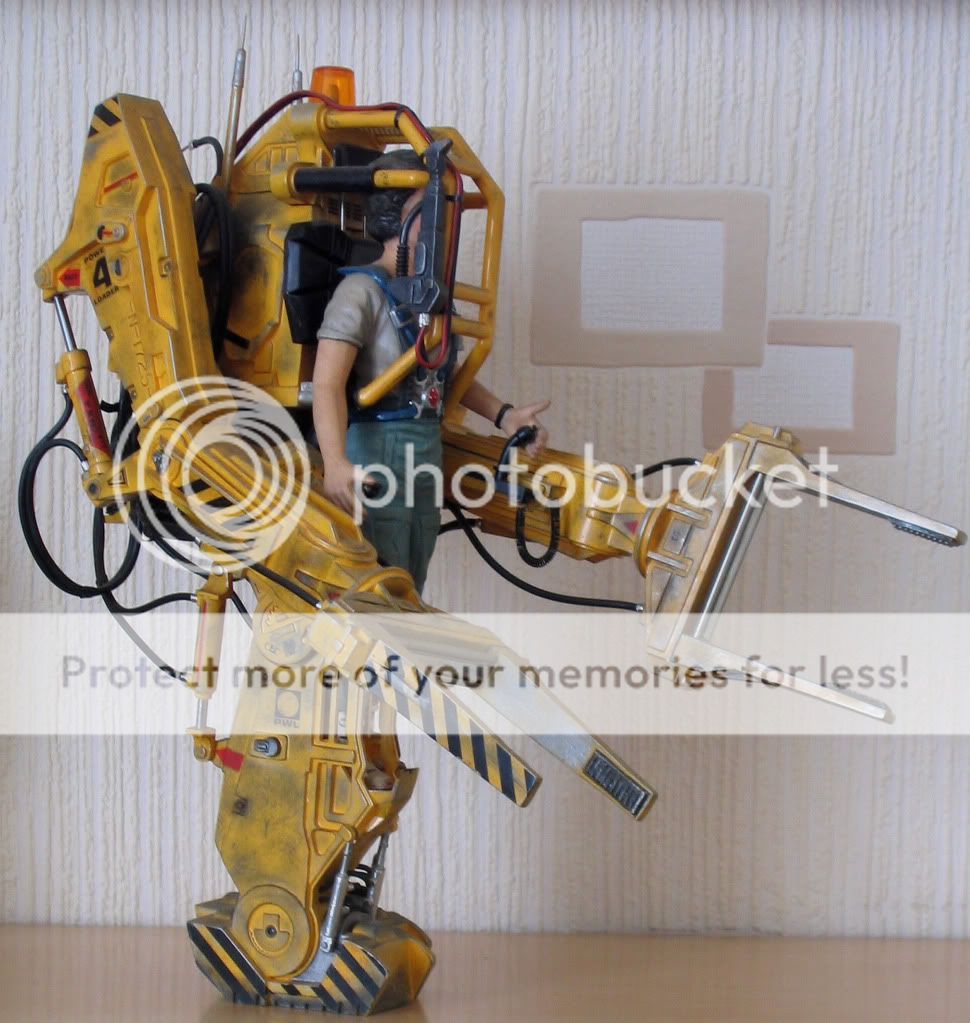
1. Looking at your image (Image 1) I see a strong bump/displacement.

As I have said bump and spec will be done once colour map is finished with. I also feel the way you done your bump makes it look more like rusted than used. Looking at Image 4 and 5 from the film the surface looks very flat, the dirt is oil based not chipping paint/rust.

2. The dark areas around your scratches.

From the ref these areas are looking more white. I did follow your advice before hand about the scratches (but had to invert the instructions as my metal level is below the paint layer) and currently have mine set as a black/grey colour as well. The tip worked very well - thx u again. I think yours stand out more prominent than mine mine because of the scale of the thing - it is in world scale and the thing is about 10 foot tail.

3. Thick layer of mud on base of foot.

Now this is based of an idea in my head more than the film, but the image 3 backs it up a lot. I wanted the Power loader based in a work environment possible on a planet and wanted the extra dirt. This steamed from looking at JCB`s and the CAT machines. This is where I think the bump map/displacement map will come in to play.

4. As strong a reflection.

You have a very strong and clear reflection, which I don`t think is right. Again looking at the ref there is no/or very little reflections apart from what is on the pistons.


As I said I am so grateful for your help so far user added image and I hope this sort of explains why I have gone down some of the paths I have so far.


Last edited by tweetytunes; 25-03-2014 at 03:23 PM.
# 24 30-03-2014 , 12:50 PM
Registered User
Join Date: Mar 2007
Posts: 1,055
Hi,

I think you definitely need more spec on the painted yellow metal. I can see it in the reference images you posted?

cheers

gubar

# 25 30-03-2014 , 11:22 PM
tweetytunes's Avatar
Subscriber
Join Date: Jan 2004
Location: Bolton - UK
Posts: 2,457

Hi,

I think you definitely need more spec on the painted yellow metal. I can see it in the reference images you posted?

cheers

gubar

Cheer man but as I have said a few times now - its just the colour map I am working on right now.

Think I am going to start over on the colour map - get all the uv`s done and the logos and stuff in the right places then add the dirt and scratches after.

Here is a redo of the wires and thought while I am doing the leg ones I would do the lot saving me having to come back to them again.

user added image


# 26 31-03-2014 , 09:04 AM
Registered User
Join Date: Mar 2007
Posts: 1,055
Fair enough. I was just addressing your last comment about the ref having little or no reflection.

Edit: Sorry I meant to add too - the model is looking cool.

# 27 31-03-2014 , 05:28 PM
tweetytunes's Avatar
Subscriber
Join Date: Jan 2004
Location: Bolton - UK
Posts: 2,457
Sorry man i did not take any offense, just every couple of post I am having to say the same thing over and over again about just doing the colour map. I always welcome feedback. Thx u again.

Found some images of "Hadleys Hope" and thinking about building the background based of them. Nothing too complex, just to setup the shot - raining and muddy. Going to build the straps for the belt and then start again on the textures I think.

user added image

user added image

user added image

Setup a new base shadder for the main colour - its a VRay metal shadder that I will layer the Stickers, Dirt and Scratches on - Also added some more lights just to help with the renders (someone at CGtalk said try it). Straight away I picked up an error with the foot slot -turns out I had two copies of it sat on top of each other. Glad it was an easy fix.

user added image


Last edited by tweetytunes; 01-04-2014 at 12:05 AM.
# 28 03-04-2014 , 10:26 PM
tweetytunes's Avatar
Subscriber
Join Date: Jan 2004
Location: Bolton - UK
Posts: 2,457
Ok thats all the missing/fixed parts of the model done.

Added the belt, radio receivers, the bars for the hands to move up and down, Fixed in side of the light on head, tweaked some of the cables.

All I have to do now is UV the upper part of the body and paint all the yellow parts.

user added image

Dang it - just noticed I have missed the cables going to the cockpit over head to the welding touch.

Getting there peeps - alot slower than I thought.


# 29 04-04-2014 , 05:29 AM
honestdom's Avatar
The Nurb Herd
Join Date: Oct 2007
Location: London
Posts: 2,381
Hey that looks like a pretty noise free render. I've notice you sometimes have really low samples in your renders.

Also, colour looks good. less murky.

# 30 04-04-2014 , 10:02 AM
tweetytunes's Avatar
Subscriber
Join Date: Jan 2004
Location: Bolton - UK
Posts: 2,457
Thanks dom - yes I am alot happy with the colour myself.

The renders are at med setting, and the extra lights have helped alot, but the settings are no where neer final (or the light set up really - if I do build that background).


Posting Rules Forum Rules
You may not post new threads | You may not post replies | You may not post attachments | You may not edit your posts | BB code is On | Smilies are On | [IMG] code is On | HTML code is Off

Similar Threads