Complex UV Layout in Maya
Over the last couple of years UV layout in Maya has changed for the better. In this course we're going to be taking a look at some of those changes as we UV map an entire character
#
31
03-04-2006
, 06:48 AM
Subscriber
Join Date: Dec 2005
Join Date: Dec 2005
Location: Boston
Posts: 339
#
32
03-04-2006
, 06:55 AM
Registered User
Join Date: Feb 2006
Join Date: Feb 2006
Location: Sydney
Posts: 184
Create a poly plane underneath your object and resize it. then create a poly sphere.
Resize the sphere so its larger than the whole scene.
Go into front or side view and cut the sphere in half Horizontally (delete the lower half) by deleting the faces. Assign the hemisphere a new lambert and raise the ambience and translucent sliders both to 75%
In your mental ray render globals set the quality level to production, then go down to the final gather tab and enable it.
Render away
You should have the same reuslts.

#
33
03-04-2006
, 12:51 PM
Subscriber
Join Date: Nov 2004
Join Date: Nov 2004
Posts: 1,043
#
34
03-04-2006
, 12:56 PM
Subscriber
Join Date: Dec 2005
Join Date: Dec 2005
Location: Boston
Posts: 339
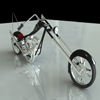
concorddawned is giving everyone a good lesson on material. Alright so I got my hemisphere and i gave its ambience and trans up to 75% and I just assigned a plane brand new lambert to all my other materials and this is what im comming up with. I tried changing the color of the lamber but it still looked very similar. Ohhh im sooo close to getting that type of render.
#
35
03-04-2006
, 02:14 PM
Registered User
Join Date: Feb 2006
Join Date: Feb 2006
Location: Sydney
Posts: 184
Enable ray trace shadows in the shadow section.
Re render as see what happens.
#
36
03-04-2006
, 03:57 PM
Subscriber
Join Date: Dec 2005
Join Date: Dec 2005
Location: Boston
Posts: 339
#
37
03-04-2006
, 08:13 PM
Subscriber
Join Date: Jun 2004
Join Date: Jun 2004
Location: San Jose, CA
Posts: 490
How do you get the render to look like that?Originally posted by ericmattison81
I owe it all to concorddawned. Hey, can you tell me what I need to do to get a render to look like this
#
38
03-04-2006
, 10:04 PM
Subscriber
Join Date: Dec 2005
Join Date: Dec 2005
Location: Boston
Posts: 339
#
39
03-04-2006
, 10:05 PM
Subscriber
Join Date: Dec 2005
Join Date: Dec 2005
Location: Boston
Posts: 339
#
40
03-04-2006
, 10:06 PM
Subscriber
Join Date: Dec 2005
Join Date: Dec 2005
Location: Boston
Posts: 339
#
41
03-04-2006
, 10:10 PM
Subscriber
Join Date: Dec 2005
Join Date: Dec 2005
Location: Boston
Posts: 339
#
42
03-04-2006
, 10:11 PM
Subscriber
Join Date: Dec 2005
Join Date: Dec 2005
Location: Boston
Posts: 339
Anhslaught, which render are you talking about.Originally posted by Anhslaught
How do you get the render to look like that?
#
43
04-04-2006
, 12:07 AM
Registered User
Join Date: Feb 2006
Join Date: Feb 2006
Location: Sydney
Posts: 184
Try Raising the Ambient/Incandescecence on the lambert for your object to around 5%
Then Change the colour. Make sure u have RGB selected (not HSV) andenter these numbers...
R ---- .624
G ---- .575
B ---- .430
That should work.
#
44
04-04-2006
, 04:47 AM
Subscriber
Join Date: Dec 2005
Join Date: Dec 2005
Location: Boston
Posts: 339
ejmattison@yahoo.com
#
45
04-04-2006
, 06:26 AM
Registered User
Join Date: Feb 2006
Join Date: Feb 2006
Location: Sydney
Posts: 184
Just set everything to a clay lambert colour and set the settings to production again, then create a image based lighting node and render.
Posting Rules Forum Rules
Similar Threads
Export texture - an existing model
by Short_Jack in forum Maya Basics & Newbie Lounge replies 15 on 10-12-2009
Skeleton wont stay with model
by Daniel_Spinello in forum Maya Basics & Newbie Lounge replies 3 on 25-11-2005
my very basic 1st char model
by jbannick in forum Work In Progress replies 2 on 10-10-2005
Model Head my 1st one :P
by syndrome in forum Work In Progress replies 4 on 18-08-2005
1st character model
by glh3586 in forum Work In Progress replies 11 on 04-07-2003
Topics


Free Courses


Full Courses


VFX News
How computer animation was used 30 years ago to make a Roger Rabbit short
On 2022-07-18 14:30:13
Sneak peek at Houdini 19.5
On 2022-07-18 14:17:59
VFX Breakdown The Man Who Fell To Earth
On 2022-07-15 13:14:36
Resident Evil - Teaser Trailer
On 2022-05-13 13:52:25
New cloud modeling nodes for Bifrost
On 2022-05-02 20:24:13
MPC Showreel 2022
On 2022-04-13 16:02:13