Agree with Jay in every way. UV mapping is really an extension of the actual model itself. I believe ( I try myself)...that when you model you have to think in 2 worlds. One is modelling..the other are UV maps...if your model has weird geo..then so will the maps...more work.
Auto mapping, as Jay has pointed out...its too flawed and cumbersome. I find separating meshes and duplicate as much as you can. Transfer attributes becomes easier as well. Making a duplicate model is easy then apply diffent textures to get a random feel to it..only idiot Surveyors will look for out of place lines (polylines).
As a Surveyor Im am getting close to full comprehend what Jay says. Naming layers...IMPORTANT...naming outliner nams....IMPORTANT. Try Crazybump mate...it does really simple solution stuff. Shameless plug for them...but it really takes the 'brain' out so you can make good imagery of your WIP's.
And as a player of games....trust me...you dont stop shooting baddies to look at the tread on a tyre...or you are dead.
Cheers bullet
bullet1968
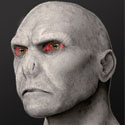
"A Darkness at Sethanon", a book I aspire to model some of the charcters and scenes


 but maybe due to my weird connections in my brain